Are you tired of looking at that grimy, dingy vinyl floor in your home or office? It’s time to give it a deep clean! Cleaning a really dirty vinyl floor can be a daunting task, but with the right tools and techniques, it can be done quickly and easily. In this article, we’ll show you how to deep clean your vinyl floor, leaving it looking like new. We’ll cover everything from preparing the floor to applying the final coat of sealant, so you can be confident in your ability to tackle even the dirtiest of floors. Get ready to say goodbye to dirt and hello to a sparkling clean vinyl floor!
Deep cleaning a really dirty vinyl floor requires a multi-step process. First, start by sweeping or vacuuming the floor to remove any loose dirt and debris. Then, mix a solution of mild dish soap and warm water, and use a soft cloth or sponge to gently clean the floor, making sure to work in small sections. Rinse the floor with clean water and dry it thoroughly with a clean towel. For tough stains or grime, you can use a non-abrasive cleaner specifically designed for vinyl floors. Avoid using harsh chemicals or abrasive cleaners, as they can damage the vinyl. It’s also important to regularly maintain the floor with regular cleaning and dusting to prevent dirt and grime from building up.
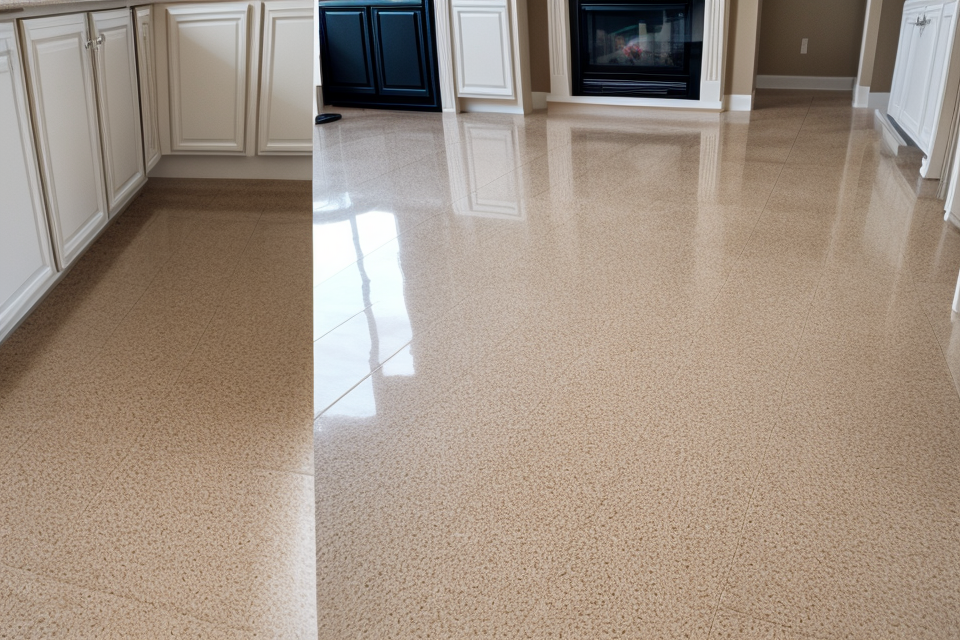
Understanding Vinyl Flooring
Types of Vinyl Flooring
When it comes to vinyl flooring, there are two main types to consider:
- Composite: This type of vinyl flooring is made from a combination of polyvinyl chloride (PVC) and other materials such as plasticizers, stabilizers, and pigments. Composite vinyl flooring is durable, flexible, and can mimic the look of other types of flooring, such as wood or stone.
- Sheet: Sheet vinyl flooring is made from a single sheet of PVC that is printed with a design or pattern. It is a budget-friendly option and can be installed quickly and easily.
Each type of vinyl flooring has its own set of benefits and drawbacks, so it’s important to choose the right one for your needs. Composite vinyl flooring is more expensive but is also more durable and versatile, while sheet vinyl flooring is less expensive but may not be as durable or versatile.
When it comes to deep cleaning a really dirty vinyl floor, the type of vinyl flooring you have will impact the cleaning process. For example, composite vinyl flooring may require a different cleaning method than sheet vinyl flooring. It’s important to choose the right cleaning method for your specific type of vinyl flooring to ensure the best results.
Pros and Cons of Vinyl Flooring
Pros of Vinyl Flooring
- Durability: Vinyl flooring is known for its durability and can withstand heavy foot traffic, making it an ideal choice for high-traffic areas in the home or office.
- Easy to Maintain: Vinyl flooring is easy to clean and maintain, and it can be easily wiped clean with a damp cloth or mop.
- Cost-Effective: Vinyl flooring is relatively inexpensive compared to other types of flooring, making it an attractive option for those on a budget.
- Versatility: Vinyl flooring comes in a wide range of colors, patterns, and textures, making it suitable for a variety of decor styles.
Cons of Vinyl Flooring
- Not Environmentally Friendly: Vinyl flooring is not an environmentally friendly option as it is made from synthetic materials and cannot be recycled.
- Can be Damaged by Heat: Vinyl flooring can be damaged by heat, and exposure to direct sunlight or hot objects can cause it to warp or discolor.
- Not Ideal for Wet Areas: Vinyl flooring is not recommended for areas that are prone to moisture, such as bathrooms or kitchens, as it can become slippery when wet and may not provide adequate slip resistance.
- Can be Perceived as Plastic: Some people may perceive vinyl flooring as being cheap or plastic-like, which can detract from the aesthetic appeal of a room.
Preparing for the Cleaning Process
Gathering Necessary Supplies
When it comes to deep cleaning a really dirty vinyl floor, having the right supplies is crucial. Here are some essential items you’ll need:
- A vacuum cleaner with a rotating brush attachment: This type of vacuum cleaner is ideal for removing dirt and debris from the vinyl floor’s surface.
- A soft-bristled brush or mop: This will be used to scrub the floor and remove any remaining dirt or stains.
- A solution of warm water and mild detergent: This mixture will be used to clean the floor and remove any stubborn stains.
- A clean cloth or mop: This will be used to dry the floor after cleaning.
- A dry vacuum cleaner: This will be used to remove any excess moisture from the floor after cleaning.
It’s important to note that when cleaning a vinyl floor, you should avoid using harsh chemicals or abrasive cleaners as they can damage the floor’s surface. Instead, opt for a mild detergent that is safe for use on vinyl floors.
Once you have gathered all the necessary supplies, you’ll be ready to start the deep cleaning process. The next step is to prepare the vinyl floor for cleaning.
Moving Furniture and Rugs
When it comes to deep cleaning a really dirty vinyl floor, one of the first steps is to move any furniture and rugs that are on the floor. This is because these items can often trap dirt and debris, which can make it difficult to clean the floor properly. Here are some more details on why moving furniture and rugs is important, and how to do it properly.
Why is it important to move furniture and rugs?
Moving furniture and rugs is important because they can trap dirt and debris, which can make it difficult to clean the floor properly. This is especially true if the furniture or rugs have been in place for a long time, as they can become heavy with dirt and grime. When this dirt and debris is not removed, it can become ground into the vinyl floor, making it difficult to remove later on.
How to move furniture and rugs safely
When moving furniture and rugs, it’s important to do so safely to avoid damaging the floor or the furniture. Here are some tips for moving furniture and rugs safely:
- Lift the furniture and rugs carefully, rather than dragging them across the floor. This can help to avoid scratches or other damage to the floor.
- Use a flat, smooth surface to place the furniture and rugs on. This can help to prevent the furniture or rugs from slipping or sliding, which can also help to avoid damage to the floor.
- If the furniture or rugs are particularly heavy, consider enlisting the help of another person to help you move them. This can help to make the process easier and safer.
By following these tips, you can help to ensure that your vinyl floor stays in good condition, even after a deep cleaning.
Removing Difficult Stains
Cleaning a vinyl floor can be a challenging task, especially when there are difficult stains that have been embedded in the surface for a long time. These stains can be caused by various factors such as spills, dirt, or even pet urine. Here are some tips on how to remove difficult stains from a vinyl floor:
- Identify the stain: The first step in removing a difficult stain is to identify the type of stain you are dealing with. This will help you choose the right cleaning method. Common stains include oil, grease, coffee, tea, wine, and pet urine.
- Dampen the stain: Apply a small amount of water to the stain to dampen it. This will help the cleaning solution penetrate the vinyl surface better.
- Apply a cleaning solution: Choose a cleaning solution that is specifically designed for vinyl floors. You can use a mixture of warm water and mild detergent or a commercial vinyl floor cleaner. Apply the solution to the stain using a soft cloth or sponge.
- Scrub the stain: Gently scrub the stain using a soft-bristled brush or a non-abrasive sponge. Be sure to work in small circular motions to avoid spreading the stain.
- Rinse the stain: Rinse the stain with clean water to remove any remaining cleaning solution.
- Dry the area: Use a clean towel to blot the area dry. Avoid using a lot of water as this can damage the vinyl floor.
- Repeat the process: If the stain is still visible, repeat the cleaning process until the stain is removed.
It is important to note that some stains may require additional treatment or professional cleaning. If you are unsure about how to remove a stain, it is best to consult a professional cleaner or the vinyl floor manufacturer’s instructions.
Cleaning the Vinyl Floor
Damp Mopping
Damp mopping is a popular method for cleaning vinyl floors. This technique involves using a damp mop to clean the floor, which helps to remove dirt, dust, and other debris that may have accumulated on the surface of the vinyl. Here are the steps to follow when damp mopping a vinyl floor:
- Prepare the Mop:
- Start by wringing out the mop and dipping it into a bucket of clean water. Ensure that the water is lukewarm, as hot water can cause the vinyl to warp or become discolored.
- Use a cleaning solution or a mixture of water and white vinegar to clean the floor. The cleaning solution should be diluted, as a concentrated solution can leave streaks or residue on the floor.
- Make sure the mop head is soft and clean, as a dirty or rough mop can scratch the vinyl surface.
- Clean the Vinyl Floor:
- Start cleaning from the farthest corner of the room and work your way towards the exit. This helps to prevent any water from flowing towards the exit and causing slips or falls.
- Move the mop in a linear motion, avoiding circular or back-and-forth movements, which can cause water to become trapped in the vinyl’s surface.
- Continue cleaning until the entire floor is covered with water.
- Dry the Vinyl Floor:
- Once you have finished cleaning, use a clean and dry mop to remove any excess water from the floor. This will help to prevent water spots or streaks from forming on the surface of the vinyl.
- If the floor feels slippery after cleaning, you can use a dry towel or a clean dry mop to absorb any excess moisture.
Damp mopping is an effective method for cleaning vinyl floors, but it is important to avoid using too much water or cleaning solutions, as this can damage the vinyl surface. By following these steps, you can effectively deep clean a really dirty vinyl floor and leave it looking shiny and new.
Spot Cleaning
When it comes to cleaning a really dirty vinyl floor, spot cleaning is an effective method to use. This technique involves focusing on individual dirty areas rather than cleaning the entire floor at once. Here are the steps to follow when spot cleaning a vinyl floor:
- Identify the dirty areas: Walk around the room and identify the areas that are particularly dirty. These may be areas where spills or accidents have occurred, or where dust and dirt have accumulated.
- Dampen a cleaning cloth: Use a clean, damp cloth to blot the dirty area. Make sure the cloth is not too wet, as this can cause the vinyl to become waterlogged and warped.
- Apply cleaning solution: Sprinkle a small amount of a mild cleaning solution, such as a solution of warm water and mild detergent, onto the dirty area. Be sure to avoid using harsh chemicals or abrasive cleaners, as these can damage the vinyl.
- Scrub gently: Use a soft-bristled brush or a non-abrasive sponge to gently scrub the dirty area. This will help to loosen and remove dirt and stains.
- Rinse thoroughly: Once you have finished scrubbing, use a clean, damp cloth to rinse the area thoroughly. Make sure to remove all traces of the cleaning solution.
- Dry the area: Use a clean, dry cloth to blot the area and remove any excess moisture. Avoid using a hair dryer or other heat source, as this can cause the vinyl to warp or damage.
- Repeat the process: Repeat the process for any other dirty areas on the vinyl floor.
By following these steps, you can effectively deep clean a really dirty vinyl floor without causing any damage. Remember to always test a small, inconspicuous area first to ensure that the cleaning solution does not cause any discoloration or damage to the vinyl.
Dry Cleaning
When it comes to cleaning a really dirty vinyl floor, dry cleaning is a great option. Here are the steps to follow:
- Vacuum the floor: Before you start cleaning, it’s important to remove any loose dirt and debris from the floor. Use a vacuum cleaner with a soft-bristled attachment to avoid scratching the vinyl surface.
- Dampen a cleaning solution: Mix equal parts of warm water and white vinegar in a spray bottle. You can also add a few drops of mild dish soap for extra cleaning power. Spray the solution onto the vinyl floor, and let it sit for a few minutes.
- Scrub the floor: Use a soft-bristled brush or a cleaning cloth to scrub the floor in a circular motion. Be sure to work in small sections, so as not to miss any spots.
- Rinse the floor: Use a clean, damp cloth to remove any cleaning solution remaining on the floor. Make sure to blot the water up quickly to avoid pooling or dripping.
- Dry the floor: Use a clean, dry cloth to blot the floor and remove any excess moisture. You can also use a clean towel to help speed up the drying process.
- Repeat the process if necessary: If the floor still looks dirty, repeat the cleaning process until the floor is spotless.
Overall, dry cleaning is a safe and effective way to deep clean a really dirty vinyl floor. It’s important to use gentle cleaning solutions and avoid harsh chemicals that could damage the vinyl surface. With a little elbow grease and the right cleaning supplies, you can have your floor looking like new in no time.
Using a Vinyl Floor Cleaner
If your vinyl floor is extremely dirty, you may need to use a vinyl floor cleaner to get it back to its best condition. Here’s how to use a vinyl floor cleaner effectively:
Steps to Follow:
- Prepare the Area: Start by removing any furniture or rugs from the area to be cleaned. This will allow you to access all areas of the floor and ensure that you can move around freely while cleaning.
- Dampen a Cleaning Cloth: Soak a cleaning cloth in warm water, and wring it out thoroughly. This will be used to apply the vinyl floor cleaner to the floor.
- Apply the Vinyl Floor Cleaner: Pour a small amount of vinyl floor cleaner onto the cleaning cloth, and work it into a lather. Use the lather to clean the floor, starting from the farthest corner and working your way towards the door.
- Scrub the Floor: Use a soft-bristled brush or a non-abrasive sponge to scrub the floor in a circular motion. This will help to remove any stubborn dirt or stains.
- Rinse the Floor: Rinse the floor thoroughly with clean water, using a cleaning cloth to remove any excess water.
- Dry the Floor: Use a clean, dry cloth to wipe down the floor and remove any excess moisture. It’s important to avoid leaving any water puddles on the floor, as this can lead to water spots and other damage.
- Repeat the Process: If the floor is still dirty after the first cleaning, repeat the process until the floor is clean and free of dirt and stains.
By following these steps, you can effectively deep clean a really dirty vinyl floor and restore it to its former glory.
Using a Mop and a Vinegar Solution
Cleaning a really dirty vinyl floor can be a daunting task, but it’s definitely doable with the right tools and techniques. One of the most effective ways to clean a vinyl floor is by using a mop and a vinegar solution. Here’s how you can do it:
Step 1: Prepare the Vinegar Solution
- Pour undiluted white vinegar into a bucket or a large container.
- Add enough warm water to the bucket to create a solution that can be easily mopped.
- Stir the solution thoroughly to ensure that the vinegar is evenly distributed.
Step 2: Dampen the Mop
- Dip the mop into the vinegar solution, ensuring that it’s completely saturated.
- Squeeze out any excess water from the mop to prevent too much water from being left on the floor.
Step 3: Clean the Vinyl Floor
- Start cleaning the vinyl floor from one corner and work your way towards the center.
- Use the wet mop to clean the floor in a circular motion, ensuring that you cover the entire surface.
- Pay special attention to areas with heavy dirt buildup, such as high-traffic areas or under furniture.
Step 4: Rinse the Mop
- Once you’ve finished cleaning the floor, rinse the mop thoroughly in clean water to remove any remaining vinegar solution.
- Squeeze out the excess water from the mop and set it aside to dry.
Step 5: Dry the Vinyl Floor
- Allow the floor to air dry completely. This may take several hours, depending on the size of the room and the amount of foot traffic.
- Alternatively, you can use a clean, dry towel to blot the floor and speed up the drying process.
By following these steps, you can effectively deep clean a really dirty vinyl floor using a mop and a vinegar solution.
Using a Microfiber Mop
A microfiber mop is an excellent tool for cleaning vinyl floors. It is designed to pick up dirt and dust particles that other cleaning methods may miss. The microfibers are made of polyester or nylon, and they are tightly woven together to create a soft, plush surface that can reach deep into the vinyl floor’s pores.
To use a microfiber mop to clean your vinyl floor, follow these steps:
- Dampen the mop head: Fill a bucket with warm water and add a small amount of mild detergent. Soak the mop head in the water, ensuring it is thoroughly saturated.
- Wring out the mop head: Squeeze out any excess water from the mop head, so it is damp but not dripping wet. You want to avoid leaving too much water on the floor, which could lead to water spots or warping.
- Clean the floor: Start cleaning the floor from one corner and work your way across the room in straight lines. Use a circular motion to clean the floor, making sure to get into the corners and along the edges. Be sure to move the mop in a consistent pattern to avoid missing any spots.
- Rinse the mop head: After cleaning the floor, rinse the mop head in clean water to remove any detergent residue.
- Dry the floor: Use a clean, dry microfiber cloth to mop up any excess water and dry the floor. Avoid using a towel or other fabric that could leave lint or fibers behind.
Using a microfiber mop to clean your vinyl floor is an efficient and effective method that can leave your floors looking like new. By following these steps, you can ensure that your vinyl floor is thoroughly cleaned without being damaged by excess water or harsh chemicals.
Using a Steam Cleaner
Using a steam cleaner is an effective method for deep cleaning a really dirty vinyl floor. Here are the steps to follow:
- Remove any loose debris: Before using the steam cleaner, remove any loose dirt, dust, or debris from the vinyl floor using a broom or vacuum cleaner.
- Fill the steam cleaner with water: Fill the steam cleaner with water until it reaches the designated line. You can add a cleaning solution to the water for better results.
- Attach the mop or pad: Attach the steam cleaner mop or pad to the machine. Make sure it is securely attached before turning on the machine.
- Turn on the steam cleaner: Turn on the steam cleaner and let it heat up for a few minutes. This will allow the water to be converted into steam.
- Clean the vinyl floor: Begin cleaning the vinyl floor by moving the steam cleaner in a back-and-forth motion. Apply enough pressure to the floor to lift the dirt and grime, but not so much that it causes damage.
- Scrub if necessary: If there is stubborn dirt or stains on the vinyl floor, use a soft-bristled brush attachment to scrub the area.
- Rinse with clean water: Once you have finished cleaning the vinyl floor, rinse it with clean water to remove any remaining cleaning solution or dirt.
- Dry the floor: Use a clean towel or cloth to dry the vinyl floor. Do not use a steam cleaner to dry the floor as it may leave water spots.
Overall, using a steam cleaner is an effective way to deep clean a really dirty vinyl floor. It can help remove tough stains and grime that regular cleaning methods may not be able to remove.
Using a DIY Solution
If you’re looking for a cost-effective and environmentally friendly way to clean your vinyl floors, consider using a DIY solution. Here are some steps to follow:
Gathering the Necessary Supplies
Before you start cleaning, make sure you have the following supplies on hand:
- A mop or a cleaning cloth
- A bucket or a large container
- Distilled white vinegar
- Water
- A cleaning solution (optional)
Mixing the Cleaning Solution
If you choose to use a cleaning solution, mix it according to the manufacturer’s instructions. In general, you’ll want to mix equal parts water and cleaning solution. If you’re using white vinegar, mix it with water in a bucket.
Applying the Cleaning Solution
Dip your mop or cleaning cloth into the cleaning solution and wring it out thoroughly. You want the mop or cloth to be damp, but not soaking wet.
Cleaning the Vinyl Floor
Start by cleaning the perimeter of the room, working your way inward. Use a circular motion to clean the floor, moving the mop or cloth in small, overlapping circles. Be sure to get the edges and corners of the room, as well as any high-traffic areas.
Rinsing the Floor
Once you’ve finished cleaning, rinse the floor with clean water. Use a clean mop or cleaning cloth to remove any excess water.
Drying the Floor
Finally, use a clean towel or cloth to dry the floor. If you’re in a hurry, you can use a hairdryer on a cool setting to speed up the process.
Overall, using a DIY solution to clean your vinyl floors is a simple and effective way to keep them looking their best.
Maintaining the Vinyl Floor
Drying the Floor
When it comes to maintaining a vinyl floor, one of the most important steps is drying it properly after cleaning. Vinyl floors can be prone to water spots and discoloration if they are not dried properly, so it is important to take the time to ensure that the floor is completely dry before walking on it or using it. Here are some tips for drying a vinyl floor:
- Use a clean, dry cloth to blot the floor. Avoid using paper towels or other materials that can leave lint or residue behind.
- Use a fan or air mover to help dry the floor. This can help to speed up the drying process and prevent water spots from forming.
- Avoid using heat sources such as space heaters or hairdryers to dry the floor. These can cause the vinyl to warp or crack.
- If the floor is still damp, you can use a dry towel or a wet/dry vacuum to help remove any excess moisture.
- Once the floor is completely dry, you can use a vinyl floor cleaner or a damp cloth to remove any residual dirt or debris.
By following these tips, you can help to ensure that your vinyl floor stays looking its best for years to come.
Buffing the Floor
When it comes to maintaining a vinyl floor, one of the most important tasks is buffing. Buffing the floor helps to remove any dirt or debris that may have accumulated over time, and it also helps to restore the shine and luster of the vinyl. Here are some steps you can follow to properly buff your vinyl floor:
- Start by sweeping or vacuuming the floor to remove any loose dirt or debris. This will make it easier to buff the floor and will also help to prevent any damage to the vinyl.
- Next, you will need to wet the floor with a clean, damp cloth. This will help to loosen any dirt or grime that may be stuck to the vinyl. Be sure to use clean water and avoid using any harsh chemicals or cleaners, as these can damage the vinyl.
- Once the floor is wet, you can begin buffing it with a soft, clean cloth or a soft-bristled brush. Start in small sections and work your way across the floor, using a circular motion to buff the vinyl. This will help to remove any dirt or debris that may be stuck to the surface of the vinyl.
- As you buff the floor, you may notice that the vinyl becomes dull or matte in appearance. This is normal and is simply a sign that the floor needs to be buffed. Continue buffing the floor until it returns to its original shine and luster.
- Finally, be sure to dry the floor thoroughly with a clean, dry cloth. This will help to prevent any water spots or damage to the vinyl.
By following these steps, you can properly buff your vinyl floor and keep it looking clean and shiny for years to come.
Removing Scratches and Dents
Deep cleaning a really dirty vinyl floor requires a thorough understanding of the different methods to remove scratches and dents. Vinyl flooring is known for its durability and ease of maintenance, but it can still get damaged over time. This section will discuss the steps involved in removing scratches and dents from a vinyl floor.
Removing Scratches and Dents
Step 1: Prepare the Area
Before removing scratches and dents, it is important to prepare the area. This involves moving any furniture or other items that may be in the way. It is also essential to vacuum the area thoroughly to remove any loose debris or dirt that may interfere with the cleaning process.
Step 2: Identify the Type of Scratch or Dent
There are different types of scratches and dents that can occur on a vinyl floor, including shallow scratches, deep scratches, and dents caused by furniture or heavy objects. It is important to identify the type of scratch or dent before attempting to remove it.
Step 3: Apply the Right Cleaning Solution
There are various cleaning solutions that can be used to remove scratches and dents from a vinyl floor. It is important to choose the right cleaning solution based on the type of scratch or dent. For example, a mild detergent solution can be used to remove shallow scratches, while a more aggressive solution may be needed for deep scratches or dents.
Step 4: Apply the Cleaning Solution
Once the right cleaning solution has been chosen, it is time to apply it to the affected area. Use a soft cloth or sponge to apply the solution to the scratch or dent, and gently rub it in using a circular motion.
Step 5: Wait for the Solution to Work
After applying the cleaning solution, it is important to wait for it to work. This can take anywhere from a few minutes to several hours, depending on the type of solution used and the severity of the scratch or dent.
Step 6: Remove the Solution
Once the cleaning solution has had enough time to work, it is time to remove it from the vinyl floor. Use a clean, damp cloth to blot the area and remove the solution. It is important to avoid using too much water, as this can cause the vinyl to become waterlogged and potentially damage it.
Step 7: Inspect the Area
After removing the cleaning solution, it is important to inspect the area to ensure that the scratch or dent has been fully removed. If there is still a noticeable mark or discoloration, it may be necessary to repeat the process or try a different cleaning solution.
Removing scratches and dents from a vinyl floor can be a challenging task, but with the right tools and techniques, it is possible to restore the floor to its original condition. By following the steps outlined above, you can deep clean a really dirty vinyl floor and keep it looking its best.
Avoiding Harsh Chemicals
When it comes to cleaning vinyl floors, it’s important to avoid using harsh chemicals. Harsh chemicals can damage the vinyl floor and strip it of its protective layer, making it more susceptible to scratches and other damage. In addition, harsh chemicals can be harmful to people and pets, so it’s important to use natural and eco-friendly cleaning solutions whenever possible.
Here are some tips for avoiding harsh chemicals when cleaning vinyl floors:
- Use a solution of warm water and mild dish soap to clean the floor. This solution is gentle and effective at removing dirt and grime without damaging the vinyl.
- Avoid using abrasive cleaners or scrubbers, as these can scratch the vinyl and create other damage.
- If you need to remove stubborn stains or marks, try using a mixture of baking soda and water. Baking soda is a natural abrasive that can help remove tough stains without damaging the vinyl.
- For a deeper clean, you can use a vinegar solution. Vinegar is a natural cleaning agent that can help remove dirt and grime without damaging the vinyl. Simply mix equal parts white vinegar and water, and use a clean cloth to wipe down the floor.
By following these tips, you can keep your vinyl floor looking clean and fresh without damaging it with harsh chemicals.
Keeping the Floor Clean
Cleaning a vinyl floor on a regular basis is crucial to maintain its appearance and prolong its lifespan. Dirt, dust, and debris can accumulate quickly, making it difficult to remove them with a simple sweep or wipe. Here are some tips for keeping your vinyl floor clean:
Regular Vacuuming
Vacuuming is one of the most effective ways to keep your vinyl floor clean. Use a vacuum cleaner with a soft-bristled attachment to avoid scratching the surface. Be sure to vacuum in the direction of the vinyl fibers to prevent them from becoming distorted.
Damp Mopping
Damp mopping is another effective method for cleaning a vinyl floor. Use a clean, damp cloth to mop the floor, and make sure to rinse the cloth frequently to avoid leaving water spots. Avoid using too much water, as this can cause the vinyl to become warped or discolored.
Dust Mop
A dust mop is a great tool for removing loose dirt and dust from a vinyl floor. It can be used daily or weekly, depending on the amount of foot traffic and the level of dirt and dust on the floor. Be sure to use a dust mop with a soft-bristled attachment to avoid scratching the surface.
Cleaning Spills
It’s important to clean up spills immediately to prevent stains from setting in. Use a clean, damp cloth to blot the spill, and mop up any excess moisture with a dry cloth. Avoid using harsh chemicals or abrasive cleaners, as these can damage the vinyl surface.
Dry Soil Removal
Dry soil can accumulate on a vinyl floor, making it appear dull and dirty. Use a soft-bristled brush or a dry mop to remove loose dirt and dust from the surface. This should be done regularly to maintain the appearance of the floor.
By following these tips, you can keep your vinyl floor clean and maintain its beauty for years to come.
Replacing Damaged Vinyl Tiles
If your vinyl floor has suffered significant damage, it may be necessary to replace some of the tiles. This can be a time-consuming process, but it’s important to ensure that your floor is in good condition before proceeding with any deep cleaning. Here are the steps to follow when replacing damaged vinyl tiles:
- Prepare the Area: Start by clearing the area around the damaged tile. Move any furniture or other items out of the way, and cover the floor with drop cloths or plastic sheeting to protect it from dust and debris.
- Remove the Damaged Tile: Use a utility knife or X-Acto knife to carefully cut around the damaged tile. Be careful not to damage the surrounding tiles. Once you have cut the tile free, lift it up and discard it.
- Clean the Area: Use a vacuum cleaner to remove any dirt or debris that may have accumulated under the tile. You may also need to use a cleaning solution to remove any stains or residue.
- Install the New Tile: Measure the area where the new tile will go, and cut the new tile to size using a utility knife or X-Acto knife. Peel off the backing paper and place the new tile in the correct position. Use a rolling pin or your hands to press the tile firmly into place.
- Seal the Joints: Use vinyl tile adhesive to seal the joints between the new tile and the surrounding tiles. Use a utility knife to trim any excess adhesive.
- Apply More Adhesive: If necessary, apply more adhesive to the back of the new tile and press it firmly into place.
- Clean the Area: Finally, use a cleaning solution to remove any remaining dirt or debris, and vacuum the area to remove any loose dirt or dust.
By following these steps, you can replace damaged vinyl tiles and restore your floor to its former glory. Remember to be patient and take your time to ensure that the new tile is properly installed and sealed.
Installing a Vinyl Floor Protector
Protecting your vinyl floor is essential to ensure its longevity and maintain its appearance. One way to do this is by installing a vinyl floor protector. A vinyl floor protector is a thin, clear film that is placed over the vinyl floor to protect it from dirt, dust, and other debris.
Here are the steps to install a vinyl floor protector:
- Start by cleaning the vinyl floor thoroughly to remove any dirt, dust, or debris.
- Measure the room to determine the amount of vinyl floor protector needed. Cut the protector to size using scissors or a utility knife.
- Peel off the backing of the vinyl floor protector and place it onto the floor, making sure to smooth out any bubbles or wrinkles.
- Use a credit card or similar flat object to smooth out the protector further, if necessary.
- Allow the vinyl floor protector to sit for 24 hours to fully adhere to the floor.
Installing a vinyl floor protector is a simple and effective way to protect your vinyl floor and keep it looking like new.
Keeping the Floor Free of Debris
Importance of Regular Vacuuming
One of the most crucial steps in maintaining a vinyl floor is regular vacuuming. Dirt, dust, and debris can accumulate quickly, and if left unattended, they can wear down the floor’s surface and cause damage to the vinyl. Therefore, it is recommended to vacuum the floor at least once a week to keep it free of debris and dirt.
Choosing the Right Vacuum Cleaner
When it comes to vacuuming a vinyl floor, it is essential to use the right vacuum cleaner. A vacuum cleaner with a gentle suction power is ideal for cleaning vinyl floors, as it will prevent scratches and damage to the surface. Avoid using a vacuum cleaner with a rotating brush, as it can scratch the floor and cause damage.
Spot Cleaning
While regular vacuuming is crucial, spot cleaning is also essential. Spills and spots can quickly ruin the appearance of a vinyl floor, and if left untreated, they can stain the floor and cause damage. Therefore, it is important to spot clean any spills or spots as soon as they occur.
In addition to vacuuming and spot cleaning, damp mopping is also an essential part of keeping a vinyl floor free of debris. Damp mopping helps to remove any dirt or debris that may have been missed during vacuuming and also helps to remove any stains or discoloration on the floor. It is recommended to use a mild detergent and warm water when damp mopping, and to avoid using excessive water, as this can cause the floor to become slippery and dangerous.
Maintaining the Floor’s Appearance
Maintaining the appearance of a vinyl floor is crucial in ensuring its longevity and preventing damage. By regularly vacuuming, spot cleaning, and damp mopping, the floor can stay free of debris and dirt, preventing scratches and damage to the surface. It is also important to avoid using abrasive cleaners or harsh chemicals, as these can damage the floor and cause discoloration. By following these simple steps, a vinyl floor can look its best for years to come.
Sealing the Vinyl Floor
The Importance of Sealing a Vinyl Floor
Sealing a vinyl floor is an essential step in maintaining its cleanliness and durability. Vinyl flooring is porous, which means it can absorb dirt, dust, and spills easily. If not sealed properly, the floor can become dull, discolored, and wear down prematurely. Sealing the vinyl floor creates a protective barrier that repels dirt and spills, making it easier to clean and maintain.
How to Seal a Vinyl Floor
Sealing a vinyl floor is a straightforward process that can be done by homeowners themselves. Here are the steps to follow:
- Prepare the Vinyl Floor: Before sealing the vinyl floor, it is important to clean it thoroughly. Remove any furniture, rugs, or curtains from the room. Sweep or vacuum the floor to remove any dust or debris.
- Sweep or Vacuum the Floor: Use a broom or vacuum cleaner to remove any loose dirt or debris from the floor.
- Apply the Sealant: Choose a high-quality sealant that is specifically designed for vinyl flooring. Apply the sealant using a clean cloth or sponge, working in small sections at a time. Make sure to cover the entire surface of the floor.
- Allow the Sealant to Dry: Once you have applied the sealant, allow it to dry completely. This may take several hours, depending on the type of sealant you have used. Follow the manufacturer’s instructions for drying times.
- Inspect the Floor: After the sealant has dried, inspect the floor for any areas that may need touch-ups. If necessary, apply more sealant to these areas and allow it to dry.
By following these steps, you can seal your vinyl floor and keep it looking clean and fresh for years to come.
Replacing Vinyl Floor Edges
When it comes to maintaining a vinyl floor, one important aspect is to replace the edges of the floor after a certain period of time. Over time, the edges of the floor can become worn, frayed, or even torn, which can lead to an unsightly appearance and potentially cause damage to the rest of the floor.
To replace the edges of a vinyl floor, the first step is to remove any furniture or items that are on the floor. This will allow you to access the edges and make it easier to work on them.
Next, you will need to measure the length of the edges that need to be replaced. This will help you determine how much new vinyl floor material you will need to purchase.
Once you have the new vinyl floor material, you can begin to remove the old edges by carefully cutting them away with a utility knife. Be sure to cut along the seam of the old edge to avoid damaging the rest of the floor.
After the old edges have been removed, you can install the new vinyl floor edges by aligning them with the existing seams and using a utility knife to cut them to size. Make sure to trim any excess material so that the new edges are flush with the rest of the floor.
Finally, you can secure the new edges in place by applying adhesive to the back of the vinyl and pressing it firmly onto the floor. Be sure to allow the adhesive to dry completely before putting any furniture or items back on the floor.
By following these steps, you can effectively replace the edges of a vinyl floor and restore its appearance. Regularly replacing the edges of a vinyl floor can help extend its lifespan and keep it looking its best.
Installing a Vinyl Floor Mat
Installing a vinyl floor mat is an effective way to maintain the cleanliness of your vinyl floors. A floor mat can trap dirt and dust, preventing them from entering your home and accumulating on your floors. Here are some steps to follow when installing a vinyl floor mat:
- Measure the area: Measure the size of the room where you will be installing the floor mat. Vinyl floor mats come in different sizes, so it’s important to choose one that will fit the space properly.
- Choose the right type of mat: There are different types of vinyl floor mats available, such as those with a slip-resistant backing or those that are designed for use in high-traffic areas. Choose a mat that is suitable for your needs.
- Installation: Vinyl floor mats can be installed in a variety of ways, depending on the type of mat you choose. Some mats can be adhesive-backed and installed by simply pressing them onto the floor, while others may require additional tools or adhesive. Follow the manufacturer’s instructions for proper installation.
- Cleaning the mat: Vinyl floor mats should be cleaned regularly to prevent the buildup of dirt and dust. Use a vacuum cleaner or a damp cloth to clean the mat, and discard of any debris that has accumulated on the mat.
By installing a vinyl floor mat, you can help maintain the cleanliness of your vinyl floors and reduce the need for frequent deep cleaning.
Applying a Vinyl Floor Sealant
When it comes to maintaining the vinyl floor, one of the most important steps is to apply a vinyl floor sealant. This sealant is designed to protect the vinyl floor from dirt, stains, and other substances that can damage it over time. By applying a vinyl floor sealant, you can help to prolong the life of your vinyl floor and keep it looking like new.
There are a few different types of vinyl floor sealants available, so it’s important to choose the right one for your needs. Some sealants are designed to provide a glossy finish, while others are designed to be more matte. Some sealants are also designed to be more durable than others, so it’s important to choose a sealant that can withstand the wear and tear of regular foot traffic.
Once you’ve chosen the right sealant for your vinyl floor, the next step is to apply it correctly. This typically involves spreading the sealant evenly over the vinyl floor using a soft cloth or applicator. It’s important to avoid applying too much sealant, as this can create a buildup that can be difficult to remove.
After the sealant has been applied, it’s important to allow it to dry completely before walking on the vinyl floor. This typically takes several hours, depending on the type of sealant used. Once the sealant is dry, your vinyl floor will be protected from dirt and stains, and will be easier to clean in the future.
In summary, applying a vinyl floor sealant is an important step in maintaining the vinyl floor. It helps to protect the floor from damage, and can help to prolong its lifespan. When choosing a sealant, it’s important to consider the type of finish you want, as well as the durability of the sealant. Proper application of the sealant is also crucial to ensure its effectiveness.
Removing a Vinyl Floor Mat
When it comes to maintaining a vinyl floor, one of the most important tasks is to regularly remove the vinyl floor mat. This is because the mat can become dirty and discolored over time, which can lead to an unsightly appearance and even damage the vinyl floor. Here are the steps you can follow to remove a vinyl floor mat:
- Lift the edges of the mat: Start by lifting the edges of the mat that are closest to the wall or furniture. Use a flathead screwdriver or a plastic spatula to gently pry up the mat.
- Lift the mat from the corners: Once you have lifted the edges of the mat, move on to the corners. Use a corner tool or a flathead screwdriver to lift the mat from the corners.
- Disconnect the mat from the wall: If the mat is connected to the wall, you will need to disconnect it before you can remove it. Use a utility knife to cut the adhesive that holds the mat to the wall.
- Vacuum the mat: Once you have removed the mat, use a vacuum cleaner to remove any dirt, dust, or debris that may have accumulated underneath.
- Clean the vinyl floor: After removing the mat, you should also clean the vinyl floor to remove any dirt or stains that may have accumulated over time. Use a vinyl floor cleaner or a mixture of warm water and mild detergent to clean the floor.
By following these steps, you can easily remove a vinyl floor mat and maintain the beauty and durability of your vinyl floor.
Applying a Vinyl Floor Finish
After cleaning the vinyl floor, it is important to apply a vinyl floor finish to protect the surface and enhance its shine. Here are the steps to apply a vinyl floor finish:
- Prepare the Area
Clear the area around the vinyl floor of any furniture or items that may get in the way. Open windows to provide ventilation and ensure proper air circulation. - Choose the Right Type of Finish
There are two types of vinyl floor finishes: wet look and matte. Choose the one that suits your preference and the style of your room. - Stir the Finish
Before applying the finish, stir the contents thoroughly to ensure that the ingredients are evenly mixed. - Apply the Finish
Using a soft cloth or a sponge, apply the finish evenly over the vinyl floor. Start from one corner and work your way towards the center of the room. Use long, even strokes to avoid leaving streaks or bubbles. - Allow the Finish to Dry
Allow the finish to dry completely according to the manufacturer’s instructions. This may take several hours or overnight. - Buff the Finish
Once the finish is dry, use a soft buffing pad or a clean cloth to buff the surface and remove any haze or streaks.
By following these steps, you can apply a vinyl floor finish that will protect your floor and enhance its appearance.
Cleaning a Vinyl Floor with a Steam Cleaner
Cleaning a vinyl floor with a steam cleaner is an effective method for deep cleaning a really dirty floor. This method is recommended for those who want to achieve a deep clean without the use of harsh chemicals.
Steam cleaners work by heating water to produce steam, which is then applied to the vinyl floor. The steam is hot enough to loosen dirt and grime, making it easier to remove. Steam cleaners can be rented or purchased, and they are relatively easy to use.
To use a steam cleaner on a vinyl floor, follow these steps:
- Preparation: Start by vacuuming the floor to remove any loose dirt and debris. Make sure to use a vacuum cleaner with a rotating brush to avoid scratching the vinyl surface.
- Heating the Steam Cleaner: Fill the steam cleaner with water and turn it on. Allow the water to heat up to the recommended temperature for cleaning vinyl floors. This usually ranges from 200-250 degrees Fahrenheit.
- Applying Steam: Once the steam cleaner is heated, apply the steam to the vinyl floor. Start in one corner of the room and work your way across the floor in a back-and-forth motion. Be sure to keep the steam cleaner moving at all times to avoid burning the vinyl.
- Scrubbing: While the steam is applied to the floor, use a soft-bristled brush or mop to scrub the floor. This will help to loosen any remaining dirt and grime.
- Rinsing: Once the floor is thoroughly clean, turn off the steam cleaner and blot the floor with a clean cloth to remove any excess moisture.
- Drying: Use a clean, dry cloth to wipe up any remaining moisture. Do not use a towel or other absorbent material that may leave lint or fibers behind.
By following these steps, you can effectively deep clean a really dirty vinyl floor using a steam cleaner.
Applying a Vinyl Floor Polish
To keep your vinyl floor in top condition, it’s important to regularly apply a vinyl floor polish. Here’s how:
Steps for Applying a Vinyl Floor Polish:
- Prepare the Area: Start by clearing the area around the vinyl floor of any furniture or obstacles. This will give you plenty of room to work without worrying about bumping into anything.
- Damp Mopping: Dampen a clean cloth with warm water and blot it across the vinyl floor. This will help to loosen any dirt or debris that has accumulated on the surface.
- Dry Mopping: Once the cloth is soaked through, wring it out and use it to blot the floor again. This time, the cloth should be dry, so that it can pick up any dirt or debris that was loosened by the wet cloth.
- Applying the Vinyl Floor Polish: Once the floor is clean and free of debris, it’s time to apply the vinyl floor polish. Use a clean, soft cloth to apply the polish evenly across the surface of the floor. Be sure to work in small sections, using overlapping strokes to ensure that the polish is applied evenly.
- Buffing the Floor: Once the polish has been applied, use a clean, soft cloth to buff the floor. This will help to even out the polish and remove any streaks or bubbles.
- Allowing the Floor to Dry: Finally, allow the floor to dry completely before replacing any furniture or rugs. This will help to prevent any damage to the polish or the vinyl floor.
By following these steps, you can keep your vinyl floor looking its best and extend its lifespan.
Removing a Vinyl Floor Polish
When it comes to maintaining a vinyl floor, one of the most important tasks is to remove any buildup of vinyl floor polish. This buildup can dull the floor’s shine and make it look dull and unappealing. Here are some steps to follow when removing a vinyl floor polish:
- Start by sweeping or vacuuming the floor to remove any loose debris or dirt. This will make it easier to remove the polish buildup.
- Mix a solution of warm water and a mild detergent in a bucket. Use a soft cloth or sponge to apply the solution to the floor, working in small sections at a time.
- Allow the solution to sit on the floor for several minutes, then use a clean cloth or sponge to scrub the floor in a circular motion. This will help to loosen the polish buildup.
- Rinse the floor thoroughly with clean water, using a clean cloth or sponge to remove any excess water.
- Dry the floor with a clean towel or let it air dry.
It’s important to note that when removing a vinyl floor polish, it’s best to avoid using harsh chemicals or abrasive cleaners, as these can damage the floor’s surface and strip it of its protective coating. Additionally, it’s recommended to avoid using excessive amounts of water, as this can lead to water spots and other damage to the floor.
Cleaning a Vinyl Floor with a Mop and a Vinegar Solution
Vinyl flooring is a popular choice for many homes and businesses due to its durability and ease of maintenance. However, even the most well-maintained vinyl floors can become dirty and discolored over time. One effective way to deep clean a really dirty vinyl floor is by using a mop and a vinegar solution. Here’s how to do it:
- Prepare the Solution
- Fill a bucket with warm water.
- Add a cup of white vinegar to the water.
- Stir the solution until the vinegar is fully dissolved.
- Dampen the Mop
- Dip the mop into the solution and wring it out thoroughly.
- Make sure the mop is damp but not dripping wet.
- Clean the Vinyl Floor
- Start at one corner of the room and work your way towards the exit.
- Use the damp mop to clean the vinyl floor in a circular motion.
- Make sure to cover the entire surface of the floor.
- Rinse the Mop
- Once you’ve finished cleaning the floor, rinse the mop in clean water to remove any remaining vinegar.
- Squeeze out the excess water and wring the mop thoroughly.
- Dry the Floor
- Use a clean, dry towel to wipe down the vinyl floor and remove any excess moisture.
- Alternatively, you can use a clean, dry mop to soak up any remaining water.
By following these steps, you can effectively deep clean a really dirty vinyl floor using a mop and a vinegar solution. This method is gentle on the vinyl flooring and can help to remove dirt, stains, and discoloration, leaving your floors looking cleaner and brighter.
Applying a Vinyl Floor Wax
Understanding Vinyl Floor Wax
Vinyl floor wax is a specially formulated product designed to protect, shine, and maintain vinyl flooring. It is typically made from a blend of natural and synthetic waxes, which provide a durable barrier against water, dirt, and wear and tear.
Preparing the Vinyl Floor for Waxing
Before applying the vinyl floor wax, it is essential to prepare the surface properly. Start by sweeping or vacuuming the floor to remove any loose dirt, dust, or debris. Then, clean the floor with a mild detergent and warm water, using a soft cloth or sponge to avoid scratching the surface. Allow the floor to dry completely, and avoid applying the wax to a wet or damp surface.
Applying the Vinyl Floor Wax
To apply the vinyl floor wax, follow these steps:
- Start by applying a small amount of wax to a clean cloth or sponge.
- Work in small sections, spreading the wax evenly over the vinyl floor using a circular motion.
- Ensure that the wax is applied evenly, avoiding any puddles or excess buildup.
- Allow the wax to dry completely, following the manufacturer’s instructions for the recommended drying time.
- Once the wax is dry, gently buff the surface with a soft cloth or buffer to remove any haze and enhance the shine.
Maintaining the Vinyl Floor After Waxing
After applying the vinyl floor wax, it is crucial to maintain the floor to preserve its appearance and protect the wax coating. Some key tips for maintaining the vinyl floor include:
- Avoiding heavy furniture or appliances that can scratch or damage the waxed surface.
- Using doormats or area rugs at entrances to help prevent dirt and debris from being tracked onto the floor.
- Damp mopping the floor regularly with a mild detergent and warm water, avoiding the use of excess water or harsh chemicals that can strip the wax.
- Refreshing the vinyl floor wax every 3-6 months, depending on the level of foot traffic and wear and tear, to maintain the floor’s protective coating and appearance.
Removing a Vinyl Floor Wax
When it comes to maintaining a vinyl floor, one of the most important tasks is to remove any buildup of wax that may have accumulated over time. Here are some steps you can follow to remove vinyl floor wax:
- Start by sweeping or vacuuming the floor to remove any loose debris or dirt. This will help to prevent the wax from becoming embedded in the floor when you start to remove it.
- Mix a solution of warm water and a mild detergent. You can use a white vinegar solution instead of detergent if you prefer. This will help to break down the wax and make it easier to remove.
- Apply the solution to a small area of the floor using a soft cloth or sponge. Make sure to work in a well-ventilated area, as the fumes from the solvent can be strong.
- Allow the solution to sit on the floor for a few minutes. This will give the solvent time to penetrate the wax and soften it.
- Use a soft-bristled brush or a non-abrasive sponge to scrub the floor in a circular motion. This will help to loosen the wax and lift it off the floor.
- Rinse the floor thoroughly with clean water to remove any remaining solvent or wax residue.
- Dry the floor thoroughly with a clean towel or a wet-dry vacuum. It’s important to remove all moisture from the floor to prevent water spots or other damage.
- Once the floor is dry, you can apply a vinyl floor cleaner or a protective coating to help maintain the floor’s appearance and protect it from future buildup.
Remember, when removing vinyl floor wax, it’s important to work in a well-ventilated area and to avoid using harsh chemicals or abrasive cleaners that could damage the floor. With the right approach, you can remove the wax and restore your vinyl floor to its original condition.
Cleaning a Vinyl Floor with a DIY Solution
Cleaning a vinyl floor can be a daunting task, especially when it’s really dirty. However, with the right cleaning solution, you can restore your vinyl floor to its former glory. Here are some steps to follow when cleaning a vinyl floor with a DIY solution:
Gather the necessary materials
Before you start cleaning your vinyl floor, you need to gather the necessary materials. These include:
- A mop or cleaning cloth
- A cleaning solution (either white vinegar or a mixture of water and mild dish soap)
- A bucket of water
- A squeegee or cleaning solution
Prepare the cleaning solution
To prepare the cleaning solution, you will need to mix white vinegar with water. You can use either a spray bottle or a cleaning cloth to apply the solution to the vinyl floor.
Alternatively, you can mix a solution of water and mild dish soap. This solution should be applied to the vinyl floor using a cleaning cloth or a mop.
Clean the vinyl floor
Once you have prepared the cleaning solution, you can start cleaning the vinyl floor. Begin by mopping or wiping the floor with the cleaning solution, using a mop or cleaning cloth.
If you’re using white vinegar, be sure to rinse the floor thoroughly with water after cleaning to remove any residue.
Dry the vinyl floor
After cleaning the vinyl floor, you need to dry it thoroughly. Use a clean, dry cloth or a cleaning solution to remove any excess moisture. This will prevent water spots from forming on the floor.
Repeat the process as needed
If your vinyl floor is particularly dirty, you may need to repeat the cleaning process several times. Be sure to allow the floor to dry completely between cleaning sessions.
Overall, cleaning a vinyl floor with a DIY solution is a simple and effective way to deep clean your floors. With a little bit of effort, you can restore your vinyl floor to its former glory.
Applying a Vinyl Floor Primer
Applying a vinyl floor primer is an important step in maintaining the vinyl floor. It helps to ensure that the floor remains in good condition for a long time. Here are some details on how to apply a vinyl floor primer:
Primer Selection
Before applying the vinyl floor primer, it is important to select the right primer for the job. There are different types of primers available, and each one is designed for a specific type of vinyl floor. For example, water-based primers are suitable for glue-down vinyl floors, while oil-based primers are ideal for floating vinyl floors.
Surface Preparation
Before applying the primer, the surface of the vinyl floor must be prepared. This involves cleaning the floor thoroughly to remove any dirt, dust, or debris. Any stains or imperfections on the floor must also be addressed before applying the primer. This can be done by sanding the surface or using a vinyl floor repair kit.
Application
Once the surface is prepared, the vinyl floor primer can be applied. This is typically done using a roller or a brush. It is important to cover the entire surface of the floor evenly to ensure that the primer adheres properly. The primer should be applied in thin layers, allowing each layer to dry completely before applying the next one. This can take several hours or even overnight, depending on the type of primer used.
Drying Time
After applying the vinyl floor primer, it is important to allow it to dry completely before proceeding with the installation of the vinyl floor. The drying time can vary depending on the type of primer used, but it is typically around 24 hours. It is important to follow the manufacturer’s instructions on the primer to ensure that it is fully cured before proceeding.
In conclusion, applying a vinyl floor primer is an important step in maintaining the vinyl floor. It helps to ensure that the floor remains in good condition for a long time. When selecting a primer, it is important to choose the right type for the job and to prepare the surface thoroughly before applying the primer. Following these steps will help to ensure a successful installation and a long-lasting vinyl floor.
Removing a Vinyl Floor Primer
Removing a Vinyl Floor Primer is a crucial step in maintaining the vinyl floor. Over time, the primer may become worn, discolored, or damaged, which can affect the appearance and durability of the floor. To ensure the floor looks its best, it’s important to know how to properly remove the primer.
Methods for Removing Vinyl Floor Primer
There are several methods for removing vinyl floor primer, each with its own advantages and disadvantages. Here are a few popular options:
- Steam Cleaning: This method involves using a steam cleaner to loosen and remove the primer from the floor. Steam cleaners can be rented or purchased and are effective at removing stubborn primer without damaging the floor. However, it’s important to be careful when using a steam cleaner, as they can cause the floor to become too hot and potentially damage it.
- Chemical Stripping: Chemical strippers are designed to dissolve and remove stubborn coatings, including vinyl floor primer. These products can be purchased at most hardware stores and are applied to the floor, allowed to sit for a period of time, and then scrubbed off. Chemical stripping can be effective, but it’s important to follow the manufacturer’s instructions carefully and wear appropriate protective gear, as these products can be hazardous.
- Scraping and Replacing: In some cases, it may be necessary to scrape off the primer and replace it with a new layer. This method requires more time and effort, but it can be effective when other methods have failed. It’s important to make sure the floor is thoroughly clean and dry before applying a new layer of primer.
Tips for Removing Vinyl Floor Primer
When removing vinyl floor primer, it’s important to follow these tips to ensure the best results:
- Work in Small Areas: Remove primer in small sections, rather than trying to do the entire floor at once. This helps prevent damage to the floor and makes the process more manageable.
- Wear Protective Gear: When using chemical strippers or steam cleaners, it’s important to wear protective gear such as gloves, goggles, and a mask to avoid inhaling fumes or coming into contact with hazardous chemicals.
- Clean the Floor Thoroughly: After removing the primer, it’s important to clean the floor thoroughly to remove any remaining residue or debris. Use a mop or cleaning solution specifically designed for vinyl floors to ensure the floor is completely clean.
Removing a Vinyl Floor Primer is a crucial step in maintaining the vinyl floor. Whether you choose to use steam cleaning, chemical stripping, or scraping and replacing, it’s important to follow the proper methods and tips to ensure the best results. With a little bit of effort and attention to detail, you can keep your vinyl floor looking its best for years to come.
Cleaning a Vinyl Floor with a Damp Mop
Cleaning a vinyl floor with a damp mop is an effective method for maintaining the floor’s appearance and prolonging its lifespan. This method involves using a mop and water solution to clean the floor, which helps to remove dirt, dust, and other debris that may have accumulated on the surface.
To clean a vinyl floor with a damp mop, follow these steps:
- Prepare the Mop: Before cleaning the floor, it is important to prepare the mop. Fill a bucket with warm water and add a small amount of mild detergent. You can also add a few drops of white vinegar to the water solution, as it helps to remove tough stains and odors.
- Dampen the Mop: Dip the mop into the water solution and wring it out thoroughly. Make sure that the mop is damp but not dripping wet.
- Clean the Floor: Start cleaning the floor from one corner and work your way towards the center. Use the damp mop to clean the floor in a sweeping motion, covering the entire surface.
- Rinse the Mop: After cleaning the floor, rinse the mop thoroughly with clean water to remove any remaining detergent or vinegar.
- Dry the Floor: Use a clean, dry towel to mop up any excess water from the floor.
It is important to avoid using too much water when cleaning a vinyl floor with a damp mop, as this can lead to water spots and other damage. Instead, focus on using enough water to effectively clean the floor without leaving it wet or damp. Additionally, it is important to avoid using harsh chemicals or abrasive cleaners, as these can damage the vinyl surface and cause discoloration or other issues.
Applying a Vinyl Floor Sealer
Vinyl flooring is a popular choice for its durability and ease of maintenance. However, over time, the floor may become dull and discolored, and it may start to show signs of wear and tear. One way to restore the look of your vinyl floor is by applying a vinyl floor sealer. This sealant will not only protect the floor from dirt and stains but also enhance its color and shine. Here’s how to apply a vinyl floor sealer:
Step 1: Prepare the Area
Before applying the sealer, it’s important to prepare the area. This means cleaning the floor thoroughly to remove any dirt, dust, or debris. Use a vacuum cleaner to remove any loose dirt, and then use a cleaning solution to remove any stains or marks. Make sure to rinse the floor thoroughly with clean water and dry it completely before proceeding.
Step 2: Choose the Right Sealer
There are different types of vinyl floor sealers available, and it’s important to choose the right one for your needs. If you want a glossy finish, choose a high-gloss sealer. If you prefer a matte finish, choose a matte sealer. You should also consider the level of protection you need. For example, if you have pets or children, you may want to choose a sealer that is resistant to stains and scratches.
Step 3: Apply the Sealer
Once you have prepared the area and chosen the right sealer, it’s time to apply it. Start by spreading the sealer evenly over the floor using a clean, soft cloth. Work in small sections, starting from the corner and moving towards the center. Use a circular motion to ensure that the sealer is applied evenly. Be sure to cover the entire floor, including the edges and corners.
Step 4: Allow the Sealer to Dry
After applying the sealer, allow it to dry completely. This usually takes around 24 hours, but it may take longer depending on the type of sealer you used. It’s important to follow the manufacturer’s instructions for drying time to ensure that the sealer is fully cured.
Step 5: Buff the Floor
Once the sealer is dry, it’s time to buff the floor to remove any excess sealer and achieve a smooth, even finish. Use a clean, soft cloth to buff the floor in a circular motion. Start from the corner and move towards the center, working in small sections. Continue buffing until the floor is smooth and shiny.
By following these steps, you can apply a vinyl floor sealer to your dirty vinyl floor and restore its look. The sealer will not only protect the floor from dirt and stains but also enhance its color and shine.
Removing a Vinyl Floor Sealer
Vinyl flooring is a popular choice for its durability and ease of maintenance. However, over time, dirt and debris can accumulate on the surface, making it appear dull and discolored. One of the best ways to restore the look of your vinyl floor is by removing the sealer that protects it. This guide will show you how to do just that, ensuring that your floor looks like new again.
Removing a Vinyl Floor Sealer
The vinyl floor sealer is a protective layer that is applied to the surface of the floor to prevent wear and tear. However, it can also make the floor look dull and discolored over time. To restore the look of your vinyl floor, you will need to remove the sealer. Here’s how:
Gather the necessary tools and materials
Before you start, make sure you have all the tools and materials you need. You will need:
- A floor buffer with a rotary brush attachment
- A stripping pad
- A vinegar solution
- A clean, damp cloth
- A squeegee
- A damp mop
Prepare the floor
Before you start removing the sealer, you will need to prepare the floor. This involves sweeping away any loose debris and dirt, and then misting the floor with a vinegar solution. The vinegar will help to break down the sealer, making it easier to remove.
Use the floor buffer to remove the sealer
Once the floor is prepared, you can start removing the sealer using a floor buffer with a rotary brush attachment. Start in one corner of the room and work your way across the floor, using the buffer to scrub away the sealer. Be sure to move the buffer in a linear motion, as circular motions can cause the sealer to become embedded in the floor.
Continue scrubbing and rinsing
Once you have scrubbed away the sealer using the floor buffer, you will need to rinse the floor with clean water. Use a clean, damp cloth to mop up any excess water, and then use a squeegee to remove any remaining water from the floor.
Dry the floor
Finally, use a damp mop to mop up any remaining water, and then use a clean, dry cloth to blot the floor dry. This will help to prevent any water spots from forming on the floor.
Inspect the floor
Once the floor is dry, inspect it to ensure that all of the sealer has been removed. If there are any remaining patches of sealer, repeat the process until the floor is completely clean.
With these steps, you should be able to remove the vinyl floor sealer and restore the look of your vinyl floor. Remember to clean your floor regularly to prevent dirt and debris from accumulating and requiring deep cleaning in the future.
Cleaning a Vinyl Floor with a Baking Soda and Water Solution
Cleaning a vinyl floor with a baking soda and water solution is a simple and effective way to deep clean a really dirty vinyl floor. Here are the steps to follow:
Materials needed:
- Baking soda
- Mop or cleaning cloth
Steps:
- Prepare the solution: In a bucket or large container, mix equal parts of baking soda and water. Stir until the baking soda is fully dissolved.
- Apply the solution: Using a mop or cleaning cloth, work the solution into the vinyl floor, starting from the perimeter and working your way towards the center. Make sure to cover the entire surface of the floor.
- Scrub if necessary: If there are stubborn stains or dirt buildup, use a soft-bristled brush to scrub the area.
- Rinse with water: After scrubbing, if necessary, rinse the floor with clean water to remove any excess baking soda.
- Dry the floor: Use a clean towel or a dry mop to soak up any excess water. It’s important to make sure the floor is completely dry to prevent water spots.
- Clean the mop or cloth: Once you’re done cleaning the floor, clean the mop or cloth in warm water and allow it to air dry.
It’s important to note that while baking soda is a great cleaning agent, it’s not recommended to use it too often as it can dull the shine of the vinyl floor. For regular maintenance, it’s best to use a vinyl floor cleaner or a solution of equal parts vinegar and water.
Applying a Vinyl Floor Restorer
Restoring a vinyl floor can be a daunting task, especially when it has been neglected for a long time. However, with the right tools and techniques, it is possible to bring it back to its former glory. One of the most effective ways to restore a vinyl floor is by applying a vinyl floor restorer. This type of product is specifically designed to clean and restore the appearance of vinyl floors, removing dirt, stains, and scuff marks.
Applying a vinyl floor restorer involves several steps, which are outlined below:
Step 1: Prepare the Vinyl Floor
Before applying the vinyl floor restorer, it is important to prepare the floor. This involves sweeping or vacuuming the floor to remove any loose dirt and debris. It is also recommended to remove any furniture or items from the floor to prevent damage to them.
Step 2: Mix the Vinyl Floor Restorer
Once the floor is prepared, the next step is to mix the vinyl floor restorer according to the manufacturer’s instructions. The restorer usually comes in a powder form that needs to be mixed with water to create a solution. It is important to use the right amount of water, as too much or too little can affect the effectiveness of the restorer.
Step 3: Apply the Vinyl Floor Restorer
After mixing the vinyl floor restorer, it is time to apply it to the floor. This can be done using a mop, a sponge, or a cloth. It is important to work in small sections, starting from the farthest corner and working your way towards the exit. Ensure that the restorer is evenly distributed over the floor, and that you scrub gently to remove any stubborn stains.
Step 4: Allow the Vinyl Floor Restorer to Dry
Once you have finished applying the vinyl floor restorer, it is important to allow it to dry completely. This usually takes several hours, depending on the amount of restorer used and the size of the floor. It is important to keep the floor dry during this time, so avoid walking on it or using it until it is completely dry.
Step 5: Buff the Vinyl Floor
After the vinyl floor restorer has dried, it is time to buff the floor to remove any haze or residue left behind by the restorer. This can be done using a dry cloth or a buffer machine. It is important to buff the floor gently to avoid scratching it.
By following these steps, you can effectively deep clean a really dirty vinyl floor and restore its appearance.
Removing a Vinyl Floor Restorer
If you have applied a vinyl floor restorer to your floors, it’s important to remove it properly to avoid any damage to the surface. Here are the steps to follow:
- Start by sweeping or vacuuming the floor to remove any loose debris.
- Use a clean, damp cloth to blot the surface of the floor, paying particular attention to any areas with heavy buildup.
- Sprinkle a small amount of white vinegar or a mild detergent onto the floor, then use a non-abrasive sponge or cloth to gently work it into the surface.
- Rinse the floor with clean water, then use a clean, dry cloth to blot up any excess moisture.
- Allow the floor to air dry completely before walking on it or resuming normal activity.
It’s important to avoid using harsh chemicals or abrasive cleaners when removing a vinyl floor restorer, as these can damage the surface of the floor and strip it of its protective coating. Instead, opt for gentle, non-abrasive cleaners that won’t harm the floor or leave behind residue.
Cleaning a Vinyl Floor with a Damp Cloth
Cleaning a vinyl floor with a damp cloth is a simple and effective way to maintain its appearance and keep it looking its best. This method is especially useful for small spills or minor dirt buildup. Here are the steps to follow:
- Inspect the Vinyl Floor: Before cleaning, it’s important to inspect the vinyl floor for any loose or damaged tiles. Loose tiles can be a hazard and should be fixed before cleaning.
- Dampen the Cloth: Soak a soft, clean cloth in warm water until it’s damp but not dripping. A microfiber cloth is ideal as it can capture dirt and dust particles effectively.
- Wipe the Floor: Gently wipe the floor with the damp cloth, starting from the top and working your way down. Use small, circular motions to avoid streaks or leaving behind water spots. Be sure to focus on any dirty or stained areas.
- Rinse and Dry: If necessary, rinse the cloth and use it to blot up any excess water. Then, use a clean, dry microfiber cloth to remove any remaining moisture. It’s important to make sure the floor is completely dry to prevent water spots or warping.
- Dry with a Towel: If the floor is still damp, you can use a clean towel to blot up any excess moisture. Be sure to wring out the towel first to remove excess water.
- Let it Air Dry: If the floor is not too dirty, you can let it air dry. This method can be particularly effective for areas with heavy foot traffic, as it helps to lift dirt and debris from the surface of the floor.
By following these steps, you can effectively clean your vinyl floor with a damp cloth. This method is gentle and non-abrasive, making it safe for all types of vinyl flooring. However, for more stubborn stains or heavy dirt buildup, you may need to use a specialized cleaning solution or call in a professional cleaner.
Applying a Vinyl Floor Conditioner
Applying a vinyl floor conditioner is an essential step in maintaining the vinyl floor and ensuring its longevity. A vinyl floor conditioner is a specialized cleaning solution that is designed to penetrate deep into the vinyl floor and remove any dirt, grime, or stains that may have accumulated over time. Here are the steps to follow when applying a vinyl floor conditioner:
- Prepare the Area: Before applying the vinyl floor conditioner, it is essential to prepare the area. This involves removing any furniture, rugs, or other items that may be on the floor. It is also recommended to vacuum the floor to remove any loose dirt or debris.
- Mix the Solution: Next, mix the vinyl floor conditioner according to the manufacturer’s instructions. The solution should be diluted with water, and the recommended ratio should be followed to avoid damaging the vinyl floor.
- Apply the Solution: Once the solution has been mixed, apply it to the vinyl floor using a clean and damp cloth. Ensure that the cloth is well-wrung out to avoid leaving streaks or spots on the floor. Start at one corner of the room and work your way outwards, covering the entire floor.
- Scrub the Floor: After applying the solution, scrub the floor using a soft-bristled brush or a non-abrasive sponge. This will help to loosen any dirt or grime that may be stuck to the floor. Be sure to scrub in small sections, working your way outwards from the center of the room.
- Rinse the Floor: Once you have scrubbed the floor, rinse it thoroughly with clean water using a clean cloth. This will remove any remaining solution from the floor.
- Dry the Floor: Finally, dry the floor thoroughly using a clean towel or a dry mop. It is essential to ensure that the floor is completely dry before replacing any furniture or rugs that were moved during the cleaning process.
By following these steps, you can effectively apply a vinyl floor conditioner and maintain the longevity of your vinyl floor. Remember to clean the floor regularly to prevent the buildup of dirt and grime, which can damage the floor over time.
Removing a Vinyl Floor Conditioner
When it comes to maintaining a vinyl floor, one of the most important tasks is to remove any conditioner that may have been applied to the surface. Here’s how to do it:
Method 1: Using a Damp Cloth
One of the simplest methods for removing a vinyl floor conditioner is to use a damp cloth. Simply wet the cloth with warm water and blot it onto the surface of the floor. Then, use a clean, dry cloth to wipe away any excess moisture. This method is best for smaller areas of the floor or for spot cleaning.
Method 2: Using a Vinyl Floor Cleaner
For larger areas of the floor or for a more thorough cleaning, you can use a vinyl floor cleaner. These cleaners are specifically designed to break down the conditioner and remove dirt and debris from the surface of the floor. Follow the instructions on the product packaging carefully, as some cleaners may require you to rinse the floor with water before cleaning.
Method 3: Using a Baking Soda and Water Solution
Another effective method for removing a vinyl floor conditioner is to use a baking soda and water solution. Mix equal parts baking soda and water to create a paste, and then apply it to the surface of the floor using a soft-bristled brush. Let the paste sit on the floor for several minutes before scrubbing it away with a damp cloth. This method is especially effective for removing tough stains and odors.
No matter which method you choose, be sure to work in small sections of the floor at a time to avoid damaging the surface. Additionally, make sure to clean up any spills or spots immediately to prevent them from turning into larger stains. By following these tips, you can keep your vinyl floor looking clean and beautiful for years to come.
Cleaning a Vinyl Floor with a Vinegar and Water Solution
Vinyl flooring is a popular choice for many homes and businesses due to its durability and ease of maintenance. However, even the most well-maintained vinyl floors can become dirty and discolored over time. If you’re looking for a deep cleaning solution for your vinyl floors, consider using a vinegar and water solution.
Vinegar is a natural cleaning agent that can help remove dirt, grime, and stains from vinyl flooring. It is also an affordable and eco-friendly option that is safe to use on most vinyl surfaces.
Here’s how to clean a vinyl floor with a vinegar and water solution:
- A bucket
-
White vinegar
-
Prepare the cleaning solution: In a bucket, mix equal parts of water and white vinegar. Use enough solution to cover the floor, but don’t make it too diluted that it won’t be effective.
- Dampen the mop or cloth: Dip the mop or cleaning cloth into the vinegar and water solution, wring it out thoroughly, and then mop or wipe the floor.
- Clean the floor: Use the mop or cloth to clean the floor in a small area at a time, working in a straight line. Make sure to cover the entire floor with the cleaning solution.
- Scrub the floor: If there are stubborn stains or dirt buildup, use a soft-bristled brush to scrub the floor in a circular motion.
- Rinse the floor: After scrubbing, rinse the floor with clean water to remove any remaining cleaning solution.
- Dry the floor: Use a clean towel or a dry mop to remove excess water from the floor. It’s important to avoid leaving wet spots on the floor as this can lead to water damage and other issues.
- Dry the floor thoroughly: If there are any wet spots remaining, use a clean towel or cloth to blot them up. It’s important to ensure that the floor is completely dry before walking on it or using it.
Tips:
- Avoid using too much vinegar or water in the cleaning solution as this can make the floor too slippery.
- If the floor is extremely dirty, you may need to repeat the cleaning process several times to achieve the desired results.
- Always test the cleaning solution on a small, inconspicuous area of the floor before using it on the entire surface to ensure that it won’t damage the vinyl.
By following these steps, you can deep clean your vinyl floors and restore their original beauty. Remember to maintain regular cleaning and upkeep to keep your floors looking their best.
Applying a Vinyl Floor Protector
Protecting your vinyl floor is essential to keep it looking new and maintaining its durability. Here are some steps to apply a vinyl floor protector:
- Prepare the Vinyl Floor: Before applying the protector, make sure the vinyl floor is clean and free from any dirt or debris. You can use a vacuum cleaner to remove any dust or dirt particles.
- Choose the Right Vinyl Floor Protector: There are different types of vinyl floor protectors available in the market. Choose one that is suitable for your vinyl floor and is easy to apply.
- Apply the Vinyl Floor Protector: Follow the instructions on the package to apply the protector. In general, you will need to spread the protector evenly over the vinyl floor using a clean cloth or roller. Be sure to cover the entire surface, including the edges and corners.
- Allow the Vinyl Floor Protector to Dry: Once you have applied the protector, allow it to dry completely. This usually takes several hours, depending on the type of protector you have used.
- Enjoy Your Clean and Protected Vinyl Floor: After the protector has dried, you can enjoy your clean and protected vinyl floor. The protector will help to prevent dirt and stains from penetrating the vinyl surface, making it easier to maintain and keep looking new.
By following these steps, you can keep your vinyl floor looking great and protected for years to come.
Removing a Vinyl Floor Protector
Removing a Vinyl Floor Protector
A vinyl floor protector is a layer of film that is often applied to new vinyl flooring to provide an additional layer of protection against scuffs and scratches. While this protector is useful during the installation process, it can become difficult to remove once it’s no longer needed.
Here are the steps to remove a vinyl floor protector:
Step 1: Cut the Protector into Strips
The first step in removing a vinyl floor protector is to cut it into strips. Use a utility knife or X-Acto knife to carefully cut along the edges of the protector, creating strips that are easy to handle.
Step 2: Heat the Protector
Next, use a hair dryer or heat gun to heat up the protector. The heat will help to loosen the adhesive that holds the protector in place, making it easier to remove. Be sure to use caution when using a heat gun, as it can get very hot.
Step 3: Peel off the Protector
Once the protector is heated, carefully peel it off the vinyl floor. Start at one corner and work your way across the floor, being careful not to damage the vinyl beneath. If the protector is particularly stubborn, you may need to use a utility knife to carefully cut it away from the floor.
Step 4: Clean the Floor
After the protector has been removed, use a damp cloth to clean the floor and remove any remaining adhesive residue. Be sure to work quickly, as the floor may become slippery if not properly cleaned.
Step 5: Inspect the Floor
Finally, inspect the floor for any damage that may have occurred during the removal process. If any damage did occur, it may be necessary to repair the floor before moving forward with the cleaning process.
By following these steps, you can easily remove a vinyl floor protector and get your flooring looking like new again.
Cleaning a Vinyl Floor with a Damp Sponge
Vinyl flooring is a popular choice for many homes and businesses due to its durability and ease of maintenance. However, even with regular cleaning, vinyl floors can become dirty and dull over time. When it comes to deep cleaning a really dirty vinyl floor, there are several methods you can try. One of the simplest and most effective methods is cleaning the floor with a damp sponge.
The Benefits of Cleaning with a Damp Sponge
Cleaning a vinyl floor with a damp sponge is a straightforward and effective method that can help to remove dirt and grime from the surface of the floor. The sponge is gently applied to the floor, which allows it to absorb the dirt and grime, making it easier to remove. This method is also effective at removing stains and dirt that have accumulated in the pores of the vinyl floor.
How to Clean a Vinyl Floor with a Damp Sponge
To clean a vinyl floor with a damp sponge, follow these steps:
- Start by sweeping or vacuuming the floor to remove any loose dirt and debris.
- Mix a solution of warm water and a mild detergent in a bucket. Use a sponge or cloth to soak up the solution.
- Gently wring out the sponge or cloth so that it is damp but not dripping.
- Place the sponge or cloth on the floor and gently press down to absorb the dirt and grime.
- Use a clean section of the sponge or cloth to blot the floor and remove any excess moisture.
- Rinse the sponge or cloth in clean water and wring it out thoroughly.
- Dry the floor with a clean towel or let it air dry.
Tips for Cleaning a Vinyl Floor with a Damp Sponge
When cleaning a vinyl floor with a damp sponge, keep the following tips in mind:
- Avoid using harsh chemicals or abrasive cleaners, as these can damage the vinyl floor.
- Do not use excessive amounts of water, as this can lead to water spots and damage to the floor.
- Be sure to clean in small sections to avoid leaving streaks or marks on the floor.
- If you notice any stains or tough grime, repeat the cleaning process as needed until the floor is clean.
Overall, cleaning a vinyl floor with a damp sponge is a simple and effective method that can help to deep clean a really dirty floor. By following these steps and tips, you can keep your vinyl floor looking its best.
Applying a Vinyl Floor Preserver
- Importance of Regular Maintenance
- Vinyl flooring is a popular choice for its durability and ease of maintenance.
- However, neglecting regular cleaning can lead to dirt and grime buildup, causing discoloration and wear and tear.
- Therefore, it is crucial to maintain the vinyl floor regularly to prolong its lifespan and maintain its appearance.
- Choosing the Right Cleaning Products
- Vinyl floors require specific cleaning products to ensure they are cleaned effectively without causing damage.
- Avoid using abrasive cleaners, bleach, or acidic substances, as they can strip the floor’s protective layer and cause discoloration.
- Look for cleaning products specifically designed for vinyl floors, which are usually labeled as “vinyl safe.”
- Applying a Vinyl Floor Preserver
- A vinyl floor preserver is a specialized product that helps protect the vinyl floor from dirt, stains, and wear and tear.
- It forms a barrier on the surface of the floor, repelling dirt and grime and making it easier to clean.
- Follow the manufacturer’s instructions carefully when applying the preserver, ensuring even coverage across the floor.
- Allow the preserver to dry completely before walking on the floor.
- Benefits of Applying a Vinyl Floor Preserver
- Applying a vinyl floor preserver provides several benefits, including:
- Protecting the floor from dirt and stains, making cleaning easier and more effective.
- Reducing the need for frequent cleaning, saving time and effort.
- Enhancing the floor’s durability and lifespan by protecting it from wear and tear.
- Maintaining the floor’s appearance by preventing discoloration and fading.
- Regularly applying a vinyl floor preserver is an essential part of maintaining the floor’s appearance and extending its lifespan.
- Applying a vinyl floor preserver provides several benefits, including:
Removing a Vinyl Floor Preserver
When it comes to maintaining a vinyl floor, one of the most important tasks is to remove any vinyl floor preserver that may have been applied to the surface. Vinyl floor preserver is a protective coating that is often applied to vinyl floors to help prevent wear and tear, but over time it can become dull and discolored. Removing it can help to restore the floor’s original shine and appearance.
Here are the steps you can follow to remove a vinyl floor preserver:
- Start by sweeping or vacuuming the floor to remove any loose debris or dirt. This will help to make the process of removing the preserver easier and more effective.
- Next, mix a solution of warm water and a mild detergent. You can use a white vinegar and water solution if you prefer. Be sure to test the solution on a small, inconspicuous area of the floor first to ensure that it won’t damage the vinyl.
- Apply the solution to the floor using a soft cloth or mop. Be sure to work in small sections at a time, starting at the farthest corner of the room and working your way towards the door. This will help to prevent streaks from forming.
- Allow the solution to sit on the floor for several minutes. This will give it time to loosen the preserver and make it easier to remove.
- Use a soft, non-abrasive cloth or sponge to scrub the floor in a circular motion. Be sure to work in small sections at a time, using a clean section of the cloth or sponge for each section.
- Rinse the floor with clean water, using a clean cloth or mop to remove any excess water.
- Dry the floor with a clean, dry cloth or towel. Be sure to blot the floor gently to avoid leaving any streaks or marks.
- Once the floor is completely dry, you can apply a fresh coat of vinyl floor cleaner or preserver if desired. This will help to protect the floor and keep it looking its best.
By following these steps, you can easily remove a vinyl floor preserver and restore the floor’s original shine and appearance.
Cleaning a Vinyl Floor with a Microfiber Cloth
When it comes to cleaning a vinyl floor, a microfiber cloth is an essential tool that can make the process easier and more effective. Here’s how to use it:
- Start by removing any loose debris or dirt from the vinyl floor with a vacuum cleaner or a broom. This will help to prevent dirt and dust from being rubbed back into the floor as you clean it.
- Dampen the microfiber cloth with warm water. This will help to loosen up any dirt or stains on the floor, making it easier to remove them. Be sure to use clean water, and avoid using soap or any other cleaning agents unless specifically recommended for use on vinyl floors.
- Use the damp microfiber cloth to gently scrub the floor in a circular motion. This will help to lift up the dirt and stains from the floor, allowing them to be removed more easily. Be sure to work in small sections at a time, moving the cloth in a consistent pattern to ensure even coverage.
- Once you have finished scrubbing the floor, use a clean, dry microfiber cloth to wipe away any excess water or moisture. This will help to prevent water spots or other damage to the floor.
- Repeat the process as necessary until the floor is clean and free of dirt and stains. Be sure to work in small sections at a time, and use a clean microfiber cloth for each section to avoid spreading dirt or debris around.
Overall, using a microfiber cloth is a simple and effective way to clean a vinyl floor. By following these steps, you can help to keep your floor looking clean and well-maintained for years to come.
Applying a Vinyl Floor Brightener
Applying a Vinyl Floor Brightener is an essential step in maintaining the cleanliness and shine of your vinyl floors. It helps to remove dirt, stains, and discoloration that regular cleaning may not be able to remove. Here are the steps to apply a Vinyl Floor Brightener:
- Prepare the Area: Clear the area around the vinyl floor of any furniture or obstacles. This will allow you to move freely and apply the brightener effectively.
- Damp Mopping: Dampen a clean cloth with water and blot it on the floor to moisten it. This will help the brightener penetrate the surface better.
- Applying the Brightener: Use a clean, damp cloth to apply the vinyl floor brightener evenly over the floor. Be sure to cover the entire surface, paying extra attention to areas with heavy staining or dirt buildup.
- Let it Set: Allow the brightener to sit on the floor for the recommended time according to the manufacturer’s instructions. This could range from a few minutes to a few hours, depending on the product.
- Scrubbing: Using a soft-bristled brush or a non-abrasive sponge, gently scrub the floor in a circular motion while the brightener is still wet. This will help to loosen and remove any grime and stains.
- Rinsing: Rinse the floor thoroughly with clean water, using a clean cloth to blot the excess water.
- Drying: Use a clean, dry cloth to soak up any remaining moisture. Avoid using a dryer or other mechanical means to dry the floor, as this can cause damage.
- Buffing: Use a clean, dry cloth to buff the floor and restore its shine.
By following these steps, you can effectively deep clean your vinyl floor and remove stubborn dirt and stains. Regular maintenance with a vinyl floor brightener will help keep your floors looking their best and prolong their lifespan.
Removing a Vinyl Floor Brightener
If you have recently applied a vinyl floor brightener, you may be wondering how to remove it once it has dried. The process of removing a vinyl floor brightener is relatively simple, but it is important to follow the correct steps to ensure that your floors are thoroughly clean and free of any residue.
- Start by sweeping or vacuuming the floor to remove any loose debris or dirt. This will help to prevent the brightener from becoming stuck in the fibers of the carpet or floor covering.
- Next, use a clean, damp cloth to blot the floor and lift the brightener off the surface. It is important to use a clean cloth each time you blot the floor, as this will help to prevent any residue from being left behind.
- If the brightener is particularly stubborn, you may need to use a clean, soft-bristled brush to gently scrub the floor. Be sure to work in small sections at a time, and avoid using too much pressure, as this can damage the floor.
- Once you have removed as much of the brightener as possible, use a clean, damp cloth to blot the floor again and remove any remaining residue.
- Finally, use a clean, dry cloth to mop up any excess moisture and leave your floors looking clean and refreshed.
It is important to note that if you are unable to remove all of the brightener with these methods, you may need to repeat the process or contact a professional cleaning service for assistance. Additionally, be sure to follow the manufacturer’s instructions for use and always work in a well-ventilated area to avoid inhaling any fumes.
Vinyl flooring is a popular choice for many homes and businesses due to its durability and ease of maintenance. However, even the most well-maintained vinyl floors can become dirty and discolored over time. In this section, we will discuss how to deep clean a really dirty vinyl floor using a mop and a vinegar solution.
Equipment and Supplies
Before you begin, you will need the following equipment and supplies:
- A mop
- Hot water
Preparation
- Remove any furniture or items from the floor.
- Sweep or vacuum the floor to remove any loose dirt or debris.
- Fill a bucket with hot water and add a few tablespoons of white vinegar.
-
Dip the mop into the bucket and wring it out thoroughly.
-
Start at one corner of the room and work your way towards the center.
- Mop the floor in a back-and-forth motion, using enough pressure to lift dirt and stains but not so much that the mop leaves streaks or scratches on the surface.
- Continue moping until the entire floor is clean and free of dirt and stains.
- If the floor still looks dirty or discolored, you can repeat the process or try using a cleaning solution designed specifically for vinyl flooring.
Finishing Touches
- Rinse the mop thoroughly with clean water and wring it out completely.
- Squeeze out any excess water from the mop head.
- Lay the mop flat to dry or hang it up to dry if it’s a fabric mop.
- Return any furniture or items to their original positions.
The Benefits of Using a Vinegar Solution
White vinegar is a natural cleaning agent that is safe for use on vinyl flooring. It can help to remove dirt and stains without causing damage to the surface of the floor. Additionally, vinegar has a neutral pH level, which means it won’t strip the floor of its protective sealant or leave a residue behind.
In conclusion, cleaning a vinyl floor with a mop and a vinegar solution is a simple and effective way to deep clean a really dirty floor. It is an affordable and eco-friendly option that can help to keep your vinyl flooring looking like new.
Applying a Vinyl Floor Cleaner
When it comes to maintaining a vinyl floor, applying a vinyl floor cleaner is an essential step in keeping it looking its best. Here are some tips on how to do it effectively:
Choosing the Right Vinyl Floor Cleaner
Before applying a vinyl floor cleaner, it’s important to choose the right one for your specific type of vinyl flooring. Different cleaners are designed for different types of vinyl, so be sure to read the label carefully and follow the manufacturer’s instructions.
Preparing the Vinyl Floor
Before applying the cleaner, it’s important to prepare the vinyl floor by sweeping or vacuuming any loose debris. This will help the cleaner to be more effective and prevent any dirt or debris from getting trapped in the vinyl fibers.
Applying the Vinyl Floor Cleaner
To apply the cleaner, use a clean cloth or mop and work in small sections, starting from the edges and working your way towards the center of the room. Be sure to follow the instructions on the cleaner’s label, as some may require you to scrub the floor before rinsing it off.
Rinsing and Drying the Vinyl Floor
Once you’ve applied the cleaner, you’ll need to rinse and dry the vinyl floor. This can be done with a clean cloth or mop, and be sure to blot up any excess water to prevent pooling or warping of the vinyl.
Buffing the Vinyl Floor
After rinsing and drying the vinyl floor, it’s important to buff it to remove any residual cleaner and to restore the shine of the vinyl. This can be done with a clean, dry cloth or a buffing machine.
By following these steps, you can effectively deep clean a really dirty vinyl floor and keep it looking its best for years to come.
Removing a Vinyl Floor Cleaner
When it comes to cleaning vinyl floors, one of the most important steps is removing the cleaner that has been used to deep clean the floor. Failure to do so properly can leave a residue that can damage the floor and make it difficult to clean in the future. Here are some steps to follow when removing a vinyl floor cleaner:
- Use warm water: The first step in removing a vinyl floor cleaner is to use warm water to rinse the floor. This helps to loosen up any remaining cleaner on the floor and makes it easier to remove.
- Use a clean mop: It’s important to use a clean mop when removing the cleaner from the floor. This helps to prevent any residue from being left behind.
- Blot the floor: After rinsing the floor with warm water, use a clean cloth or sponge to blot the floor. This helps to remove any remaining cleaner and prevent streaks from forming.
- Dry the floor: Once the floor has been cleaned and rinsed, it’s important to dry the floor thoroughly. This helps to prevent any water spots from forming and can help to prolong the life of the vinyl floor.
By following these steps, you can ensure that your vinyl floor is properly cleaned and maintained, and that any residue left behind by the cleaner is removed. This will help to prevent damage to the floor and make it easier to clean in the future.
Cleaning a vinyl floor with a damp mop is an effective method for maintaining the floor’s appearance and prolonging its lifespan. This method involves using a damp mop to clean the floor, rather than using water or other cleaning solutions. Here are the steps to follow when cleaning a vinyl floor with a damp mop:
- Dampen the Mop: The first step is to dampen the mop. You can use plain water for this, but it’s best to use a cleaning solution specifically designed for vinyl floors.
- Clean the Floor: Once the mop is damp, you can start cleaning the floor. Begin by moving the mop in a circular motion, using long strokes to cover the entire floor. Make sure to lift the mop off the floor occasionally to avoid leaving any water spots.
- Scrub Tough Stains: For tough stains or dirt buildup, you may need to use a cleaning solution that’s specifically designed for vinyl floors. Apply the solution to a clean, damp cloth and scrub the affected area in a circular motion.
- Rinse the Mop: Once you’ve finished cleaning the floor, rinse the mop thoroughly to remove any cleaning solution or dirt.
- Dry the Floor: Finally, use a clean, dry towel to wipe up any excess water and to dry the floor.
By following these steps, you can effectively clean your vinyl floor with a damp mop and keep it looking great for years to come.
When it comes to maintaining a vinyl floor, applying a vinyl floor cleaner is an essential step in keeping it looking its best. Here are some important details to keep in mind when using a vinyl floor cleaner:
Choosing the Right Vinyl Floor Cleaner
When selecting a vinyl floor cleaner, it’s important to choose one that is specifically designed for vinyl flooring. These cleaners are typically formulated to be gentle on the floor while still effectively removing dirt and stains. Look for a cleaner that is labeled as “vinyl safe” or “vinyl-compatible” to ensure that it won’t damage the floor.
Preparing the Area
Before applying the vinyl floor cleaner, it’s important to prepare the area. Start by removing any furniture or rugs from the room, and sweep or vacuum the floor to remove any loose debris. This will help the cleaner to be more effective and prevent any dirt or debris from interfering with the cleaning process.
Applying the Cleaner
Once the area is prepared, it’s time to apply the cleaner. Start by mixing the cleaner according to the manufacturer’s instructions, and then apply it to the floor using a clean, damp cloth. Work in small sections, starting from the edges and working your way toward the center of the room. Be sure to rinse the cloth frequently to prevent any buildup of dirt or residue.
Scrubbing Tough Stains
If there are any particularly stubborn stains on the floor, you may need to use a soft-bristled brush or non-abrasive sponge to scrub the area. Be sure to test the cleaner on a small, inconspicuous area of the floor first to ensure that it won’t damage the vinyl.
Rinsing and Drying
After you’ve finished cleaning the floor, it’s important to rinse it thoroughly with clean water to remove any remaining cleaner. Use a clean, dry cloth to blot the floor and remove any excess moisture. It’s important to allow the floor to dry completely before replacing any furniture or rugs, as wet flooring can damage the vinyl.
After you have applied a vinyl floor cleaner, it is important to remove it properly to ensure that your floor is completely clean and free of any residue. Here are the steps you can follow to remove a vinyl floor cleaner:
- Use a clean, damp cloth to blot the cleaner from the floor. Start in one corner of the room and work your way outwards, using a new cloth for each section of the floor. This will help to lift any dirt or debris that has been trapped in the cleaner.
- Use a dry, clean cloth to mop up any excess cleaner. Make sure that the cloth is not too wet, as this can leave streaks on the floor.
- If there is still residue on the floor, you can use a soft-bristled brush to gently scrub the surface. Be sure to rinse the brush thoroughly before and after use to avoid leaving any debris on the floor.
- Finally, use a clean, damp cloth to mop up any remaining cleaner or residue. Rinse the cloth thoroughly before use and wring it out completely to avoid leaving puddles on the floor.
It is important to be thorough when removing a vinyl floor cleaner, as any residue left behind can attract dirt and make your floor look dull and dirty. By following these steps, you can ensure that your floor is clean and ready for a protective sealant or finish, if desired.
Cleaning a vinyl floor with a damp mop is an effective method for maintaining the floor’s appearance and ensuring its longevity. This method involves using a damp mop to clean the floor, rather than using a dry mop or vacuum cleaner. Here are the steps involved in cleaning a vinyl floor with a damp mop:
- Dampen the Mop: First, you will need to dampen the mop by wringing it out in a bucket of clean water. The water should be slightly cooler than room temperature, as hot water can cause the vinyl to warp or discolor.
- Mop the Floor: Next, you will need to start at one corner of the room and work your way across the floor, using the damp mop to clean the vinyl. Make sure to overlap each stroke to ensure that the entire floor is covered.
- Rinse the Mop: After you have finished mopping the floor, you will need to rinse the mop in the bucket of clean water to remove any dirt or debris that may be trapped in the fibers.
- Squeeze Out Excess Water: Before you start mopping again, it is important to squeeze out excess water from the mop to prevent water spots from forming on the floor.
- Dry the Floor: Once you have finished mopping the floor, you will need to dry it thoroughly with a clean towel or dry mop. It is important to avoid using a wet mop or towel to dry the floor, as this can leave water spots and damage the vinyl.
Overall, cleaning a vinyl floor with a damp mop is a simple and effective method for maintaining the floor’s appearance and ensuring its longevity. By following these steps, you can keep your vinyl floor looking clean and beautiful for years to come.
There are many different types of vinyl floor cleaners available on the market, so it’s important to choose the right one for your specific needs. Look for a cleaner that is specifically designed for use on vinyl floors, as this will ensure the best results.
When selecting a cleaner, consider the type of dirt or stains you need to remove. For example, if you have oil or grease stains, look for a cleaner that is specifically designed to tackle those types of stains.
Once you have selected the right cleaner, it’s time to apply it to your vinyl floor. Start by mixing the cleaner according to the manufacturer’s instructions, as some cleaners may need to be diluted before use.
Use a soft-bristled brush or a clean cloth to apply the cleaner to the vinyl floor in a small, overlapping pattern. This will help to ensure that the cleaner is evenly distributed and that all areas of the floor are covered.
It’s important to work in small sections of the floor at a time, as this will allow the cleaner to penetrate the vinyl and loosen dirt and stains more effectively.
Letting the Vinyl Floor Cleaner Work
After applying the cleaner, allow it to sit on the vinyl floor for the recommended amount of time. This will give the cleaner time to penetrate the vinyl and loosen dirt and stains.
Be sure to follow the manufacturer’s instructions for the recommended dwell time, as applying too much cleaner or leaving it on for too long can damage the vinyl.
Removing the Vinyl Floor Cleaner
Once the recommended dwell time has passed, use a clean, damp cloth to blot the vinyl floor and remove the cleaner. Be sure to work in small sections of the floor at a time, as this will help to prevent streaks and ensure that the floor is thoroughly clean.
If any stubborn stains remain, you can repeat the process as needed, but be sure to rinse the floor thoroughly between applications to prevent buildup.
When it comes to cleaning vinyl floors, one of the most important steps is removing the cleaner that was used to deep clean the floor. This is because many cleaners can leave a residue behind, which can dull the surface of the floor and make it appear dirty again.
Here are some steps you can follow to remove a vinyl floor cleaner:
- Start by blotting up as much of the cleaner as possible with a clean cloth or sponge. This will help to remove any excess cleaner that may have been spread over a larger area.
- Next, use a clean cloth or sponge that has been dampened with clean water. Gently blot the floor in a circular motion to remove any remaining cleaner.
- If there is still a residue on the floor, you can use a cleaning solution that is specifically designed to remove residue. Apply the solution to a clean cloth or sponge and blot the floor in a circular motion.
- Once you have removed the cleaner, it is important to dry the floor thoroughly. Use a clean towel or cloth to blot up any excess moisture.
- Finally, once the floor is completely dry, you can apply a vinyl floor cleaner that is designed to protect and restore the shine of the floor. This will help to keep the floor looking its best for longer.
It is important to follow these steps carefully to ensure that all of the cleaner is removed from the floor, as leaving a residue can lead to long-term damage to the floor.
Cleaning a vinyl floor with a damp mop is an effective method for maintaining the floor’s appearance and prolonging its lifespan. This method involves using a damp mop to clean the floor, rather than using soap or other cleaning products. Here are the steps to follow when cleaning a vinyl floor with a damp mop:
- Start by removing any large debris or dirt from the floor. This can be done by sweeping or vacuuming the floor before mopping.
- Fill a bucket with warm water. The water should be warm, but not hot, as this can cause the vinyl to warp or discolor.
- Dip the mop into the water. Make sure the mop is fully submerged in the water to ensure it is thoroughly wet.
- Squeeze out the excess water from the mop. This will prevent the floor from becoming too wet and potentially causing water damage.
- Begin mopping the floor in a steady, back-and-forth motion. Make sure to cover the entire floor, paying particular attention to any areas with heavy foot traffic or dirt buildup.
- Rinse the mop. If there is still dirt on the floor, repeat the process with a clean section of the mop.
- Blot the floor dry with a clean towel. This will help to remove any excess water and prevent the floor from becoming slippery.
By following these steps, you can effectively clean a vinyl floor with a damp mop. This method is safe, effective, and requires minimal effort. However, it is important to note that this method should not be used to clean particularly dirty or stained areas of the floor. In these cases, it may be necessary to use a different cleaning method or product.
- Choose the right cleaner: There are many different types of vinyl floor cleaners available, so it’s important to choose one that is specifically designed for vinyl floors. Look for a cleaner that is safe for use on vinyl and will not damage the surface.
- Read the instructions: Before using the cleaner, be sure to read the instructions carefully. This will help you understand how much cleaner to use, how long to leave it on the floor, and how to clean it up afterwards.
- Apply the cleaner: Once you have chosen the right cleaner and read the instructions, it’s time to apply it to the floor. Start by mopping the floor with a damp cloth, then apply the cleaner evenly over the surface of the floor. Be sure to work in small sections at a time, so that the cleaner does not become too diluted.
- Allow the cleaner to sit: After applying the cleaner, allow it to sit on the floor for the recommended amount of time. This will give it time to penetrate the dirt and grime on the floor, making it easier to remove.
- Scrub the floor: After the recommended amount of time has passed, it’s time to scrub the floor. Use a soft-bristled brush or a non-abrasive sponge to scrub the floor in a circular motion. This will help to loosen the dirt and grime, making it easier to remove.
- Rinse the floor: Once you have scrubbed the floor, it’s time to rinse it with clean water. Use a clean mop or cloth to remove any remaining cleaner from the floor.
- Dry the floor: After rinsing the floor, it’s important to dry it thoroughly. Use a clean towel or cloth to blot the floor and remove any excess water.
By following these steps, you can effectively deep clean a really dirty vinyl floor and keep it looking its best.
When it comes to cleaning vinyl floors, one of the most important steps is removing the cleaner that has been used to deep clean the floor. Failure to do so properly can leave residue behind, which can cause the floor to appear dull and can even damage the vinyl over time. Here are the steps you can follow to remove a vinyl floor cleaner effectively:
- Wait for the cleaner to dry: Before you can remove the cleaner, you need to wait until it has dried completely. This is important because wet cleaner can be difficult to remove and can leave streaks on the floor.
- Use a clean cloth: Use a clean, dry cloth to blot the cleaner off the floor. Make sure the cloth is clean and dry, as any moisture or dirt can leave residue behind.
- Work in small sections: Cleaning the floor in small sections can help you remove the cleaner more effectively. Start at one end of the room and work your way down to the other end, blotting the cleaner off as you go.
- Use a vacuum cleaner: Once you have blotted the cleaner off the floor, use a vacuum cleaner to remove any remaining residue. This is especially important if you used a cleaner that contains abrasive particles, as these can scratch the vinyl if they are not removed properly.
- Damp mop with clean water: Finally, damp mop the floor with clean water to remove any remaining cleaner residue. Make sure to use a clean mop and fresh water, and wring out the mop thoroughly before use.
By following these steps, you can effectively remove a vinyl floor cleaner and keep your floors looking their best.
Cleaning a vinyl floor with a damp mop is an effective method for maintaining the floor’s appearance and ensuring its longevity. This method involves using a mop that is dampened with clean water, rather than soapy water or other cleaning solutions.
Steps for Cleaning a Vinyl Floor with a Damp Mop
- Begin by removing any furniture or items that are on the floor. This will allow you to clean the floor more thoroughly and ensure that nothing is damaged during the cleaning process.
- Next, fill a bucket with clean water and wring out a mop to use for cleaning the floor.
- Begin cleaning the floor by moving the mop in a straight line, starting at one corner of the room and working your way to the opposite corner. Be sure to move the mop in a straight line, rather than going over the same area multiple times.
- Continue to move the mop in a straight line until the entire floor has been cleaned. If there are any particularly dirty areas, you may need to repeat this process or use a cleaning solution.
- Once the floor has been cleaned, use a clean, dry mop to remove any excess water. This will help to prevent water spots from forming on the floor.
- Finally, dry the floor by either air-drying or using a clean towel to absorb any remaining moisture.
Benefits of Cleaning a Vinyl Floor with a Damp Mop
There are several benefits to cleaning a vinyl floor with a damp mop, including:
- It is a gentle cleaning method that will not damage the floor or leave streaks or spots.
- It is an efficient method that can be completed quickly and easily.
- It is a cost-effective method, as it does not require the use of expensive cleaning solutions.
- It is a low-effort method that requires minimal equipment and can be done on a regular basis to maintain the floor’s appearance.
In conclusion, cleaning a vinyl floor with a damp mop is a simple and effective method for maintaining the floor’s appearance and ensuring its longevity. By following the steps outlined above, you can keep your vinyl floor looking its best without damaging it or spending a lot of time or money.
- Choose the right cleaner: There are many different types of vinyl floor cleaners available, so it’s important to choose one that is specifically designed for vinyl flooring. Look for a cleaner that is safe for use on vinyl and won’t damage the surface.
- Read the instructions: Before using the cleaner, make sure to read the instructions carefully. This will help you understand how much cleaner to use, how long to leave it on the floor, and how to clean it up afterwards.
- Apply the cleaner: Start by applying the cleaner to a small, inconspicuous area of the floor to test it. If there are any negative reactions, such as discoloration or damage to the floor, stop using the cleaner immediately. If the cleaner works well on the test area, apply it to the rest of the floor, working in small sections at a time. Use a clean, damp cloth to apply the cleaner evenly over the floor.
- Allow the cleaner to work: Let the cleaner sit on the floor for the recommended amount of time, usually several minutes. This will give it enough time to penetrate the dirt and grime on the floor and break it down.
- Scrub if necessary: If the floor is particularly dirty, you may need to scrub it with a soft-bristled brush before applying the cleaner. This will help loosen up the dirt and make it easier to remove.
- Rinse thoroughly: After the cleaner has worked for the recommended amount of time, use a clean, damp cloth to remove it from the floor. Make sure to rinse the floor thoroughly to remove all traces of the cleaner.
- Dry the floor: Finally, use a clean, dry cloth to remove any excess moisture from the floor. It’s important to make sure the floor is completely dry before walking on it or using it again.
After applying a vinyl floor cleaner, it is important to remove it properly to ensure the floor is completely clean and free of any residue. Here are the steps to follow:
- Use a clean, damp cloth to blot the vinyl floor and remove any excess cleaner. This will help to lift any dirt or debris that has been loosened by the cleaner.
- Use a clean, dry cloth to blot the floor again to remove any remaining moisture. It is important to make sure the floor is completely dry before moving on to the next step.
- Use a dry, clean brush or broom to gently sweep away any debris that remains on the floor. This will help to remove any remaining dirt or debris that may have been missed during the blotting process.
- Use a dry, clean cloth to wipe down the entire floor. This will help to remove any remaining cleaner residue and leave the floor looking clean and refreshed.
It is important to remove the vinyl floor cleaner properly to prevent any buildup of residue, which can lead to dirt and debris becoming trapped in the floor’s pores and leading to dullness and discoloration over time. By following these steps, you can ensure that your vinyl floor is thoroughly clean and ready for the next step in the deep cleaning process.
Cleaning a vinyl floor with a damp mop is an effective method for maintaining the floor’s appearance and ensuring its longevity. This method involves using a damp mop to clean the floor, rather than using water or other cleaning solutions. Here are the steps involved in cleaning a vinyl floor with a damp mop:
- Preparing the Mop: The first step is to prepare the mop. This involves wringing out the mop to remove excess water, so that it is damp but not soaking wet. The mop should be damp, but not dripping wet, as this can cause the vinyl floor to become too wet and potentially warped.
- Cleaning the Floor: Once the mop is prepared, the next step is to clean the floor. This involves using the damp mop to gently clean the floor, moving it in a circular motion to cover the entire surface. The mop should be used in a light, gentle manner to avoid causing any damage to the floor.
- Rinsing the Mop: After cleaning the floor, the mop should be rinsed thoroughly to remove any dirt or debris that may have been picked up during the cleaning process. This helps to ensure that the floor is completely clean and free of any residue.
- Drying the Floor: Finally, the floor should be dried thoroughly to prevent any water spots or other damage. This can be done by using a clean, dry towel or by allowing the floor to air dry.
By following these steps, you can effectively clean a vinyl floor with a damp mop, leaving it looking clean and refreshed.
Use a soft-bristled brush or a clean cloth to apply the cleaner to the vinyl floor in a small, circular motion. Be sure to work in small sections at a time, as applying the cleaner in large sections can cause streaks.
Waiting for the Vinyl Floor Cleaner to Work
After applying the cleaner, give it time to work. The amount of time it takes for the cleaner to work will depend on the type of cleaner you’re using and the amount of dirt or stains on your vinyl floor. Typically, you should wait at least 10-15 minutes before rinsing the floor.
While you’re waiting, you can use this time to clean other areas of your home or take a break.
Rinsing the Vinyl Floor
Once the cleaner has had enough time to work, it’s time to rinse the vinyl floor. Use a clean, damp cloth to remove any remaining cleaner from the floor. Be sure to rinse the floor thoroughly to remove all cleaner residue.
If you notice any remaining stains or dirt after rinsing, you may need to repeat the cleaning process or use a spot cleaner to tackle those specific areas.
Drying the Vinyl Floor
After rinsing the vinyl floor, it’s important to dry it thoroughly to prevent water spots from forming. Use a clean, dry cloth to blot the floor and remove any excess water. If you have a fan or air mover, you can use it to help speed up the drying process.
Once the floor is completely dry, you can proceed with any necessary maintenance or repairs.
When it comes to cleaning vinyl floors, removing the cleaner is just as important as applying it. Here are some steps to follow to ensure that all traces of the cleaner are removed, leaving your floor looking its best.
Use a Clean, Damp Cloth
The first step in removing a vinyl floor cleaner is to use a clean, damp cloth to wipe down the entire floor. This will help to loosen any remaining cleaner on the surface of the floor and make it easier to remove. Be sure to use a cloth that is soft and gentle, as vinyl floors can be sensitive to scratches or other damage.
Blot, Don’t Rub
When blotting the floor with the damp cloth, be sure to blot rather than rub. Rubbing can cause the floor to become scratched or damaged, while blotting will help to lift dirt and grime off the surface of the floor. Start at one corner of the room and work your way across the floor, using a fresh section of the cloth as needed.
Use a Cleaning Solution
If the cleaner has been on the floor for a while or if there is particularly stubborn dirt or grime, you may need to use a cleaning solution to help remove it. Mix a solution of warm water and a mild detergent, then use a soft cloth to blot the floor in the same way as before. Be sure to rinse the floor thoroughly with clean water afterward to remove any remaining soap residue.
Dry the Floor
Once you have removed all traces of the cleaner, it’s important to dry the floor thoroughly. Use a clean, dry cloth to blot the floor and remove any excess moisture. Be sure to pay special attention to any areas where water may have pooled, as these can become slippery and dangerous if not dried properly.
By following these steps, you can ensure that your vinyl floor is thoroughly clean and free of any residue or damage from the cleaner. With regular maintenance, your vinyl floor will look great for years to come.
Cleaning a vinyl floor with a damp mop is an effective method for maintaining the floor’s appearance and extending its lifespan. This method involves using a damp mop to remove dirt, dust, and debris from the floor, leaving it looking clean and refreshed. Here are the steps to follow:
- Start by removing any furniture or items that are on the floor. This will allow you to clean the entire floor thoroughly.
- Next, fill a bucket with warm water and add a mild detergent or a vinyl floor cleaner. Make sure to read the label and follow the manufacturer’s instructions for use.
- Dip the mop into the soapy water and wring it out thoroughly. This will ensure that the mop is damp but not soaking wet.
- Start cleaning the floor from one corner, working your way across the room in a back-and-forth motion. Use the mop to apply the soapy water to the floor, scrubbing gently to remove any dirt or stains.
- Continue cleaning the floor until the entire area is covered. Make sure to pay extra attention to high-traffic areas and any spots that may be particularly dirty.
- Once you have finished cleaning the floor, use a clean mop to remove any excess water and detergent. Make sure to wring the mop out thoroughly before use.
- Allow the floor to air dry completely before replacing any furniture or items that were moved. This will help prevent any water spots or damage to the floor.
By following these steps, you can effectively clean a vinyl floor with a damp mop and keep it looking its best. Remember to use a mild detergent or vinyl floor cleaner and to wring the mop out thoroughly before use to avoid any water spots or damage to the floor.
There are many different types of vinyl floor cleaners available on the market, so it’s important to choose the right one for your specific needs. Look for a cleaner that is specifically designed for vinyl floors and avoid using cleaners that are meant for other types of flooring.
Before applying the vinyl floor cleaner, it’s important to prepare the area. Start by removing any furniture or rugs from the room, and sweep or vacuum the floor to remove any loose dirt or debris.
Once the area is prepared, it’s time to apply the cleaner. Start by moistening a clean cloth with the cleaner and wringing it out thoroughly. Then, use the cloth to clean the floor in small sections, working from the edges towards the center. Be sure to rinse the cloth frequently to avoid leaving streaks.
If there are any tough stains on the floor, you may need to use a scrub brush to help break them up. Apply the cleaner directly to the stain and use the brush to work it into the floor. Then, use a clean cloth to wipe away the stain.
Drying the Floor
After cleaning the floor, it’s important to dry it thoroughly to prevent water spots from forming. Use a clean towel or cloth to blot the floor and remove any excess moisture.
Repeat as Needed
Depending on the level of dirt and grime on your vinyl floor, you may need to repeat the cleaning process several times to achieve the desired results. Be sure to follow the instructions on the cleaner carefully and avoid using too much product, as this can lead to a buildup of residue on the floor.
By following these tips, you can keep your vinyl floor looking clean and fresh for years to come.
When it comes to cleaning vinyl floors, removing the cleaner is just as important as applying it. Here are some steps to follow:
- Start by blotting up as much of the cleaner as possible with a clean cloth. This will help to minimize the amount of cleaner that is left on the floor.
- Use a clean, damp cloth to gently scrub the floor in a circular motion. This will help to loosen any remaining cleaner and dirt.
- Rinse the cloth thoroughly with clean water before blotting the floor again to remove any excess moisture.
- Allow the floor to air dry completely before walking on it or putting anything back in place.
It’s important to avoid using too much water when removing the cleaner, as this can lead to water spots and a slippery surface. Instead, use a damp cloth to gently scrub the floor and remove any remaining cleaner.
- Start by vacuuming the floor to remove any loose dirt and debris. This will make it easier to clean the floor and prevent dirt from being left behind.
- Fill a bucket with warm water and add a few drops of mild detergent. Mix the solution thoroughly until the detergent is fully dissolved.
- Dip the mop into the water and wring it out thoroughly. You want the mop to be damp, but not soaking wet.
- Start cleaning the floor in small sections, working your way across the room. Use the mop to gently scrub the floor, moving in a circular motion. Be sure to work in one direction only, to avoid leaving swirl marks on the floor.
- Continue cleaning the floor until the entire surface is clean and free of dirt and debris.
- Rinse the mop thoroughly with clean water and wring it out before using it to clean the floor again. This will help to prevent dirt from being left behind on the floor.
- Once the floor is clean, use a clean, dry mop to remove any excess water.
It’s important to note that this method is best suited for cleaning vinyl floors that are in good condition and don’t have any deep stains or damage. For floors with more significant issues, you may need to use a different cleaning method or seek professional cleaning services.
- Choose the right cleaner: There are many different types of vinyl floor cleaners available, so it’s important to choose one that is specifically designed for vinyl floors. Look for a cleaner that is pH-neutral and won’t damage the floor’s finish.
- Read the instructions: Before using the cleaner, be sure to read the instructions carefully. This will help you understand how much cleaner to use, how long to let it sit on the floor, and how to properly rinse and dry the floor.
- Apply the cleaner evenly: When applying the cleaner, make sure to cover the entire floor evenly. Use a clean, damp cloth to apply the cleaner, and be sure to work in small sections to avoid missing any spots.
- Let it sit: Once you’ve applied the cleaner, let it sit on the floor for the recommended amount of time. This will give the cleaner time to penetrate the dirt and grime on the floor.
- Rinse thoroughly: After the recommended cleaning time has passed, rinse the floor thoroughly with clean water. Be sure to remove all of the cleaner, as any remaining residue can dull the floor’s finish.
- Dry the floor: Once the floor has been rinsed, use a clean towel to blot up any excess water. Allow the floor to air dry completely before walking on it.
By following these steps when applying a vinyl floor cleaner, you can help keep your vinyl floors looking clean and vibrant for years to come.
After thoroughly cleaning the vinyl floor, it is essential to remove any remaining cleaner. Here’s how to do it:
- Rinse the floor with water: First, rinse the floor with clean water to remove any dirt or debris that may be stuck in the cleaner. This will ensure that all the cleaner is removed from the floor.
- Use a clean cloth: Use a clean, damp cloth to blot the floor and remove any excess water. Make sure the cloth is clean to avoid leaving any streaks or residue on the floor.
- Dry the floor: Once the floor is clean and free of water, use a clean, dry cloth to wipe it down. This will help to prevent any water spots or damage to the floor.
- Inspect the floor: Before moving on to the next step, inspect the floor to ensure that all the cleaner has been removed. If there are any streaks or residue remaining, repeat the process until the floor is clean.
By following these steps, you can ensure that all the vinyl floor cleaner has been removed from the floor, leaving it clean and free of residue.
Cleaning a vinyl floor with a damp mop is an effective method for maintaining the floor’s appearance and extending its lifespan. This method involves using a damp mop to clean the floor, rather than using water or other cleaning solutions. Here are the steps involved in cleaning a vinyl floor with a damp mop:
- Cleaning the Floor: Once the mop is prepared, the next step is to clean the floor. This involves using the damp mop to clean the floor in a circular motion. It is important to cover the entire floor, paying special attention to areas with heavy foot traffic or dirt buildup.
- Rinsing the Mop: After cleaning the floor, the mop should be rinsed with clean water to remove any dirt or debris that may have been picked up during cleaning. This ensures that the floor is left clean and free of any residue.
- Drying the Floor: Once the floor has been cleaned and rinsed, it is important to dry the floor thoroughly. This can be done by using a clean towel or cloth to blot the floor dry. It is important to avoid using a lot of heat or direct sunlight to dry the floor, as this can cause the vinyl to become warped or discolored.
By following these steps, you can effectively clean a vinyl floor with a damp mop, leaving it looking clean and refreshed. It is important to regularly maintain the vinyl floor to keep it looking its best and to extend its lifespan.
- Apply the cleaner: Once you have chosen the right cleaner and read the instructions, it’s time to apply it to the floor. Use a clean, damp cloth to apply the cleaner evenly over the entire surface of the floor.
- Allow the cleaner to work: After applying the cleaner, allow it to work for the recommended amount of time. This will give it enough time to break down the dirt and grime on the floor.
- Scrub if necessary: If there is stubborn dirt or stains on the floor, you may need to scrub the area with a soft-bristled brush before rinsing it off.
- Rinse thoroughly: After the cleaner has worked for the recommended amount of time, use a clean, damp cloth to rinse the floor thoroughly. Be sure to remove all the cleaner from the floor to prevent any residue from being left behind.
-
Dry the floor: Once the floor has been rinsed, use a clean towel to blot the floor dry. Avoid using a lot of heat, such as from a hair dryer, as this can damage the vinyl.
-
Use a clean, damp cloth to blot the vinyl floor and remove any excess cleaner. It is important to use a clean cloth to avoid leaving any dirt or debris on the floor.
- Use a clean, dry cloth to mop up any remaining cleaner. It is important to remove as much of the cleaner as possible to prevent any streaks or residue from remaining on the floor.
- Use a dry, clean cloth to mop up any remaining water or moisture. This will help to prevent any water spots or discoloration from occurring on the floor.
- Allow the floor to dry completely before walking on it or placing any furniture back in the room. This will help to prevent any damage to the floor or any items that may be placed on it.
It is important to follow these steps carefully to ensure that the vinyl floor is completely clean and free of any residue or dirt. By taking the time to properly remove the cleaner, you can help to extend the life of your vinyl floor and keep it looking its best.
Cleaning a vinyl floor with a damp mop is an effective method for maintaining the floor’s appearance and prolonging its lifespan. This method involves using a damp mop to clean the floor, rather than using chemical cleaners or abrasive cleaners that can damage the vinyl.
- Dampen the Mop: First, dampen the mop with clean water. It is important to use clean water to avoid leaving streaks or residue on the floor.
- Apply Cleaner: If needed, apply a small amount of vinyl floor cleaner to the mop head. This will help to break down any dirt or grime on the floor.
- Clean the Floor: Using a circular motion, start cleaning the floor in small sections. Work your way across the room, overlapping each section as you go.
- Rinse the Mop: After cleaning each section, rinse the mop in clean water to remove any cleaner or dirt.
- Dry the Floor: Once you have finished cleaning the floor, use a clean towel to blot up any excess water. It is important to avoid leaving the floor wet, as this can lead to water spots and damage to the vinyl.
By following these steps, you can effectively clean a vinyl floor with a damp mop and maintain its appearance. It is recommended to clean the floor regularly to prevent dirt and grime from building up and damaging the vinyl.
- Apply the cleaner: Once you have chosen the right cleaner and read the instructions, it’s time to apply it to the floor. Start by mopping the floor with a damp cloth, then apply the cleaner evenly over the surface of the floor. Be sure to avoid getting the cleaner on the edges of the floor or on any obstacles in the room.
- Allow the cleaner to work: After applying the cleaner, give it time to work. The instructions will usually recommend a specific amount of time to let the cleaner sit on the floor before cleaning it up. This will allow it to penetrate the vinyl and break down the dirt and grime.
- Clean up the cleaner: After the recommended amount of time has passed, it’s time to clean up the cleaner. Use a clean damp cloth to mop up any excess cleaner that is still on the floor. If there is any cleaner remaining on the floor, use a dry cloth to wipe it up.
By following these steps, you can effectively apply a vinyl floor cleaner and keep your vinyl flooring looking its best.
Once you have finished cleaning your vinyl floor, use a clean, damp cloth to remove any remaining cleaner. Be sure to wring out the cloth thoroughly before using it to avoid leaving water spots on the floor.
Use a Vinyl Floor Cleaner-Specific Deglosser
Vinyl floor cleaners can leave a residue on the floor, which can dull the finish and make it look less than its best. To avoid this, use a vinyl floor cleaner-specific deglosser to remove any remaining cleaner. This will help to restore the shine and protect the finish of your floor.
Dry the Floor Properly
After cleaning and deglossing your vinyl floor, it is important to dry it properly to prevent water spots and other damage. Use a clean, dry cloth to blot the floor and remove any excess moisture. Be sure to avoid using heat or other drying methods that could damage the floor.
By following these steps, you can ensure that your vinyl floor is clean, shiny, and protected. Remember to clean your floor regularly to keep it looking its best and to prevent dirt and grime from building up.
Cleaning a vinyl floor with a damp mop is an effective method for maintaining the floor’s appearance and extending its lifespan. This method involves using a mop that is dampened with clean water, rather than soapy water or other cleaning solutions. The process involves several steps, which are outlined below:
Step 1: Inspect the Vinyl Floor
Before cleaning the vinyl floor, it is important to inspect it for any damage or wear and tear. If there are any significant issues, such as deep scratches or gouges, it may be necessary to repair the floor before cleaning it.
Step 2: Dampen the Mop
Next, you will need to dampen the mop with clean water. It is important to use clean water to avoid leaving any residue or soap buildup on the floor.
Step 3: Clean the Floor
Once the mop is damp, you can begin cleaning the floor by making small, circular motions with the mop. It is important to avoid using excessive pressure, as this can cause damage to the vinyl floor.
Step 4: Rinse the Mop
As you clean the floor, it is important to regularly rinse the mop to remove any dirt or debris that may be trapped in the fibers. This will help to prevent any residue from being left behind on the floor.
Step 5: Dry the Floor
After cleaning the floor, it is important to dry it thoroughly to prevent any water spots or other damage. You can use a clean towel or a dry mop to accomplish this.
By following these steps, you can effectively clean a vinyl floor with a damp mop and maintain its appearance for years to come.
The first step in applying a vinyl floor cleaner is to choose the right one. There are many different types of cleaners available, so it’s important to select one that is specifically designed for vinyl floors. Look for a cleaner that is safe for use on vinyl and won’t damage the surface.
Preparing the Vinyl Floor
Before applying the cleaner, it’s important to prepare the vinyl floor. This includes sweeping or vacuuming any loose debris, dust, or dirt from the surface. It’s also a good idea to remove any furniture or rugs from the area to be cleaned.
Once the vinyl floor is prepared, it’s time to apply the cleaner. Start by mixing the cleaner according to the manufacturer’s instructions. It’s important to use the recommended amount of cleaner to avoid damaging the vinyl floor.
Next, use a clean cloth or mop to apply the cleaner to the vinyl floor. Work in small sections, starting from the farthest corner and working your way towards the exit. Be sure to use a circular motion when cleaning to avoid streaks or uneven application.
Rinsing the Vinyl Floor
After applying the cleaner, it’s important to rinse the vinyl floor thoroughly with clean water. This helps to remove any remaining cleaner and prevent any buildup on the surface. Use a clean cloth or mop to rinse the floor, starting from the farthest corner and working your way towards the exit.
Drying the Vinyl Floor
Once the vinyl floor is rinsed, it’s important to dry it thoroughly. Use a clean towel or cloth to blot the surface and remove any excess water. Avoid using a blow dryer or other heat source to dry the floor, as this can damage the vinyl surface.
By following these steps, you can effectively apply a vinyl floor cleaner and maintain the look of your vinyl floors for years to come.
- Start by blotting the vinyl floor with a clean, damp cloth to remove any excess cleaner.
- Next, use a clean, dry cloth to wipe away any remaining cleaner residue.
- If there is still some cleaner residue remaining on the floor, use a solution of equal parts water and vinegar to rinse the floor.
- Use a clean, damp cloth to blot the floor and remove any excess water.
- Finally, use a clean, dry cloth to wipe the floor and remove any remaining moisture.
It is important to be thorough when removing the vinyl floor cleaner to avoid leaving any residue that could dull the shine of the floor or create a film that is difficult to remove in the future.
- Dampen the Mop: First, dampen the mop by soaking it in water. It is important to use clean water, and not to use any cleaning solutions or chemicals.
- Wring Out the Mop: Next, wring out the mop to remove excess water. The mop should be damp, but not dripping wet.
- Clean the Floor: Begin cleaning the floor by using the damp mop to clean in a small area. Move the mop in a back-and-forth motion, and use a circular motion to clean around the edges of the room.
- Rinse the Mop: After cleaning a small area, rinse the mop in clean water to remove any dirt or debris.
- Repeat the Process: Continue cleaning the floor in small sections, rinsing the mop as needed. Once the entire floor has been cleaned, mop up any excess water with a clean towel.
This method is a great way to clean a vinyl floor, as it allows for the removal of dirt and debris without causing any damage to the floor. It is also a quick and easy way to maintain the floor’s appearance between deep cleanings.
Before applying the cleaner, it’s important to prepare the vinyl floor by sweeping or vacuuming any loose debris. This will help the cleaner to be more effective and prevent any dirt or debris from getting stuck in the cleaner’s residue.
Once the vinyl floor is prepared, it’s time to apply the cleaner. Start by applying the cleaner to a small, inconspicuous area of the floor to test its effectiveness. If the cleaner works well and doesn’t leave any residue, you can proceed to apply it to the rest of the floor.
When applying the cleaner, be sure to work in small sections at a time, starting from the farthest corner of the room and working your way towards the exit. This will help to prevent any streaks or uneven application. Use a clean, damp cloth to apply the cleaner evenly over the floor.
Allowing the Vinyl Floor Cleaner to Work
After applying the cleaner, allow it to work for the recommended amount of time before rinsing it off. This will give the cleaner enough time to break down the dirt and grime on the vinyl floor.
When it’s time to rinse the cleaner off, use a clean, damp cloth to blot the floor gently. Be sure to remove all of the cleaner and any residue that may be left behind.
Once the cleaner has been removed, it’s important to dry the vinyl floor thoroughly. Use a clean, dry cloth to blot the floor and remove any excess moisture. Be sure to avoid using a lot of heat or direct sunlight, as this can damage the vinyl and cause it to warp or crack.
When it comes to cleaning vinyl floors, removing the cleaner is just as important as applying it. Here are some steps to follow to ensure that all traces of the cleaner are removed, leaving your floor looking and feeling fresh:
Damp Mop Method
One of the simplest ways to remove a vinyl floor cleaner is by using a damp mop. This method is especially effective if you’re using a solution that’s water-based. Here’s how to do it:
- Rinse the mop thoroughly with clean water to remove any residue from the previous cleaning solution.
- Squeeze out excess water from the mop, so it’s damp but not dripping wet.
- Mop the floor in a straight motion, using small, overlapping strokes to cover the entire surface. Be sure to go over each section of the floor several times to ensure that all traces of the cleaner are removed.
- Use a clean, dry mop to remove any excess water from the floor.
Spray and Wipe Method
If you prefer a faster and more efficient cleaning method, the spray and wipe method may be more suitable for you. Here’s how to do it:
- Rinse the spray bottle thoroughly with clean water to remove any residue from the previous cleaning solution.
- Fill the spray bottle with clean water, leaving enough room for it to be atomized into a fine mist.
- Spray the floor with the clean water, using a back-and-forth motion to cover the entire surface. Be sure to go over each section of the floor several times to ensure that all traces of the cleaner are removed.
- Use a clean, dry cloth to mop up any excess water from the floor.
Squeegee Method
The squeegee method is a great option if you want to remove the cleaner quickly and efficiently. Here’s how to do it:
- Rinse the squeegee thoroughly with clean water to remove any residue from the previous cleaning solution.
- Fill a bucket with clean water and dip the squeegee into it, making sure it’s completely submerged.
- Hold the squeegee at a 45-degree angle and run it over the floor in a straight motion, using a back-and-forth motion to cover the entire surface. Be sure to go over each section of the floor several times to ensure that all traces of the cleaner are removed.
Regardless of which method you choose, it’s important to ensure that all traces of the cleaner are removed before moving on to the next step in the cleaning process. Failure to do so can result in a buildup of residue, which can lead to dirt and grime becoming trapped in the vinyl fibers, making it harder to clean in the future.
Cleaning a vinyl floor with a damp mop is an effective method for maintaining the floor’s appearance and prolonging its lifespan. This method involves using a mop that is dampened with clean water, rather than a solution of chemicals or cleaning agents. The process can be broken down into a few simple steps:
- Start by removing any furniture or rugs from the room. This will allow you to clean the entire floor without having to move heavy objects around.
- Next, use a bucket to fill a mop with clean water. It is important to use clean water rather than a solution of chemicals, as this will not damage the vinyl floor or leave behind any residue.
- Dip the mop into the water and wring it out thoroughly. This will ensure that the mop is evenly dampened and not too wet or too dry.
- Start cleaning the floor from one corner, working your way across the room in small sections. Use the mop to gently scrub the floor, moving in a circular motion to lift dirt and grime off the surface.
- As you clean, rinse the mop in the water to keep it damp. This will help to remove any dirt or debris that has been lifted off the floor.
- Continue cleaning the floor until the entire surface has been thoroughly cleaned. Be sure to pay extra attention to any areas that may have been missed during previous cleanings.
- Once the floor is clean, use a clean, dry mop to wipe away any excess water. This will help to prevent any water spots from forming on the surface of the floor.
By following these steps, you can effectively clean a vinyl floor with a damp mop. This method is safe, effective, and will help to keep your vinyl floor looking its best for years to come.
- Choose the right cleaner: There are many different types of vinyl floor cleaners available, so it’s important to choose one that is specifically designed for vinyl floors. Look for a cleaner that is labeled as safe for use on vinyl and follows the manufacturer’s instructions for application.
- Dilute the cleaner: Most vinyl floor cleaners need to be diluted with water before use. Follow the manufacturer’s instructions for the correct dilution ratio, as using too much cleaner can cause the vinyl to become slippery or discolored.
- Apply the cleaner: Use a soft, damp cloth to apply the cleaner to the vinyl floor. Work in small sections, using a circular motion to clean the floor. Be sure to avoid using abrasive or harsh chemicals, as these can damage the vinyl.
- Scrub if necessary: If there are stubborn stains or dirt buildup on the vinyl floor, you may need to use a soft-bristled brush or non-abrasive sponge to scrub the area. Be sure to rinse the area thoroughly with clean water after scrubbing.
- Rinse and dry: After cleaning the vinyl floor, use a clean, damp cloth to remove any excess cleaner. Then, use a clean, dry cloth to wipe down the floor and remove any water spots. It’s important to make sure the floor is completely dry before using it, as standing water can cause damage to the vinyl.
By following these steps when applying a vinyl floor cleaner, you can help keep your vinyl floors looking their best for years to come.
When it comes to cleaning vinyl floors, removing the cleaner is just as important as applying it. Here are some steps to follow to ensure that all traces of the cleaner are removed from the floor:
- Rinse the floor thoroughly: Once you have allowed the cleaner to sit on the floor for the recommended amount of time, use a clean, damp cloth to remove any residue. Make sure to rinse the floor thoroughly to ensure that all the cleaner has been removed.
- Use a clean cloth: Avoid using the same cloth to clean the floor that you used to apply the cleaner. This can leave residue on the floor, which can affect the final result.
- Dry the floor: After rinsing the floor, use a clean, dry cloth to remove any excess moisture. It is important to ensure that the floor is completely dry before walking on it, as excess moisture can cause the floor to become slippery.
- Check for residue: Once you have finished cleaning the floor, use a clean, white cloth to check for any residue. If there is any residue remaining on the cloth, it means that there is still cleaner on the floor, and you may need to repeat the cleaning process.
By following these steps, you can ensure that all traces of the cleaner are removed from the floor, leaving it looking clean and refreshed.
Cleaning a vinyl floor with a damp mop is an effective method for maintaining the floor’s appearance and prolonging its lifespan. This method involves using a mop and water solution to clean the floor, rather than harsh chemicals or abrasive cleaners.
Step 1:
Prepare the mop by wringing it out thoroughly and adding a cleaning solution to the water. The solution can be made with a small amount of mild detergent or white vinegar. It is important to avoid using too much solution, as this can lead to a buildup of moisture on the floor.
Step 2:
Begin cleaning the floor by moving the mop in a linear motion, using a small amount of solution to clean the floor. Avoid using a circular motion, as this can cause the solution to pool in one area and create streaks.
Step 3:
Rinse the mop thoroughly with clean water after each pass, and continue cleaning the floor until it is completely clean. It is important to remove any excess water from the floor to prevent water spots or streaks.
Step 4:
Dry the floor thoroughly with a clean towel or a dry mop. Avoid using a lot of heat or direct sunlight, as this can cause the floor to become warped or discolored.
Overall, cleaning a vinyl floor with a damp mop is a simple and effective method for maintaining the floor’s appearance and prolonging its lifespan. It is important to use a cleaning solution that is gentle and does not contain harsh chemicals, and to remove any excess water from the floor to prevent water spots or streaks.
The first step in applying a vinyl floor cleaner is to choose the right one for your floors. There are many different types of vinyl floor cleaners available, so it’s important to choose one that is specifically designed for vinyl floors. Look for a cleaner that is safe for use on vinyl and won’t damage the surface.
Before applying the vinyl floor cleaner, it’s important to prepare the floor. This includes sweeping or vacuuming any loose debris or dirt from the surface of the floor. It’s also a good idea to remove any furniture or rugs from the area to be cleaned.
Applying the Vinyl Floor Cleaner
Once the floor is prepared, it’s time to apply the vinyl floor cleaner. Start by moistening a clean cloth with the cleaner and using it to scrub the floor in a small area. This will allow you to see how the cleaner reacts with the vinyl and whether it’s safe to use on the floor. If there are no adverse reactions, continue to apply the cleaner to the rest of the floor, using a clean cloth to scrub as you go.
After applying the vinyl floor cleaner, it’s important to rinse the floor thoroughly with clean water. This will remove any residue left behind by the cleaner and help to restore the vinyl floor to its original condition.
Once the floor has been rinsed, it’s important to dry it thoroughly. Use a clean towel or cloth to blot the floor and remove any excess water. It’s important to avoid using heat or harsh chemicals to dry the floor, as this can damage the vinyl and cause it to become discolored or dull.
By following these steps, you can ensure that your vinyl floor stays looking its best for years to come.
Step 1: Use a clean, damp cloth
After cleaning your vinyl floor with a vinyl floor cleaner, use a clean, damp cloth to wipe away any remaining cleaner. This will help to remove any excess cleaner that may have missed the floor or was not fully absorbed by the floor.
Step 2: Use a dry cloth to remove excess water
Once you have wiped away the cleaner with a damp cloth, use a dry cloth to remove any excess water that may be on the floor. This will help to prevent water spots from forming on the floor, which can be difficult to remove once they have dried.
Step 3: Dry the floor thoroughly
It is important to dry the floor thoroughly after cleaning it with a vinyl floor cleaner. Use a clean, dry cloth to blot the floor and remove any excess moisture. This will help to prevent the floor from becoming too slippery, which can be dangerous for people walking on it.
Step 4: Inspect the floor for any remaining cleaner
Once you have dried the floor, inspect it for any remaining cleaner. If you see any spots or areas that still look dirty, repeat the cleaning process until the floor is completely clean.
Remember, when removing a vinyl floor cleaner, it is important to use clean, damp and dry cloths to prevent any residue or water spots from forming on the floor. Taking the time to properly remove the cleaner will help to keep your vinyl floor looking its best and prevent damage from excess moisture.
- Dampen the Mop: Start by dampening the mop with clean water. It is important to use clean water to avoid leaving any residue on the floor.
- Apply Cleaning Solution: If the floor is particularly dirty, you may want to apply a cleaning solution to the mop before mopping the floor. This will help to break down any dirt or grime on the floor.
- Mop the Floor: Begin mopping the floor in small sections, starting from the farthest corner. Use a back-and-forth motion to cover the entire floor. Be sure to apply even pressure to the mop, as this will help to lift dirt and stains from the floor.
- Rinse the Mop: After mopping the floor, rinse the mop in clean water to remove any cleaning solution or dirt.
- Dry the Floor: Use a clean, dry towel to blot the floor and remove any excess water. It is important to avoid leaving any water spots on the floor.
- Dry the Floor Thoroughly: Use a clean, dry towel to blot the floor and remove any excess water. It is important to avoid leaving any water spots on the floor.
- Check for Any Residue: After cleaning the floor, check for any residue or dirt that may remain on the floor. If there is any residue, repeat the cleaning process until the floor is completely clean.
Overall, cleaning a vinyl floor with a damp mop is a simple and effective method for maintaining the floor’s appearance and ensuring its longevity. By following these steps, you can keep your vinyl floor looking its best.
- Choose the right cleaner: There are many different types of vinyl floor cleaners available, so it’s important to choose one that is specifically designed for vinyl flooring. Look for a cleaner that is pH-neutral and won’t damage the floor’s finish.
- Rinse thoroughly: After the recommended cleaning time has passed, use a clean, damp cloth to rinse the floor thoroughly. Be sure to remove all of the cleaner, as any remaining residue can attract dirt and grime.
- Dry the floor: Once the floor has been rinsed, use a clean towel to blot up any excess water. It’s important to avoid using a lot of heat or direct sunlight to dry the floor, as this can cause damage to the vinyl.
When it comes to cleaning vinyl floors, one of the most important steps is removing the cleaner that has been used to deep clean the floor. This is because if the cleaner is not properly removed, it can leave behind a residue that can dull the shine of the floor and make it look dirty again.
Here are some steps to properly remove a vinyl floor cleaner:
- Use a clean, damp cloth to blot the floor and remove any excess cleaner.
- Use a clean, dry cloth to mop up any remaining cleaner.
- Use a clean, damp cloth to blot the floor again and remove any residue.
- Use a clean, dry cloth to mop up any remaining residue.
- Use a clean, dry cloth to buff the floor and remove any water spots.
It is important to note that the type of cleaner used may dictate the method of removal. For example, some cleaners may require a specific type of cloth or mop to be used during the removal process. It is always best to follow the manufacturer’s instructions when cleaning and removing vinyl floor cleaners.
In addition, it is important to clean the mop or cloth used to remove the cleaner. This can be done by washing it with soap and water or using a disinfectant solution to sanitize it. This will help to prevent any buildup of residue or bacteria, which can affect the overall cleanliness of the floor.
By following these steps, you can ensure that your vinyl floor is thoroughly clean and free of any residue or buildup. This will help to maintain the shine and appearance of the floor, and prolong its lifespan.
Cleaning a vinyl floor with a damp mop is an effective method for maintaining the floor’s appearance and extending its lifespan. This method involves using a mop and water to clean the floor, which is more gentle than using harsh chemicals or abrasive cleaners. Here are the steps to follow:
- Prepare the mop: Before cleaning the vinyl floor, it is essential to prepare the mop. Fill a bucket with warm water and add a few drops of mild detergent. Swirl the mop in the soapy water to create a soapy solution.
- Wet the floor: Dip the mop into the soapy water and wring it out thoroughly. Then, start at one corner of the room and work your way across the floor, using the mop to scrub the floor. Be sure to cover the entire floor with the soapy solution.
- Scrub the floor: Use the mop to scrub the floor, making sure to get into the grout lines and corners. Scrubbing the floor helps to remove dirt, grime, and stains.
- Rinse the floor: After scrubbing the floor, dip the mop back into the soapy water and wring it out thoroughly. Then, start at one corner of the room and work your way across the floor, using the mop to rinse the floor. Be sure to remove any soap residue from the floor.
- Dry the floor: After rinsing the floor, use a clean towel or cloth to blot the floor and remove any excess water. You can also use a dry mop to remove any remaining water. It is essential to make sure the floor is completely dry before walking on it or using it.
- Repeat as necessary: If the floor is still dirty or stained, repeat the cleaning process until the floor is clean and free of dirt and stains.
Overall, cleaning a vinyl floor with a damp mop is a simple and effective method for maintaining the floor’s appearance and extending its lifespan. It is essential to use a mild detergent and to rinse the floor thoroughly to avoid leaving soap residue on the floor.
- Choose the right cleaner: There are many different types of vinyl floor cleaners available, so it’s important to choose one that is specifically designed for vinyl flooring. Look for a cleaner that is labeled as safe for use on vinyl and follows the manufacturer’s instructions for application.
- Work in small sections: Vinyl floors can be quite large, but it’s best to work in small sections when applying the cleaner. This will allow you to thoroughly clean the floor without missing any spots and will also allow the cleaner to penetrate the floor more effectively.
- Use a clean, damp cloth: When applying the cleaner, use a clean, damp cloth to work it into the floor. Avoid using too much water, as this can lead to water spots and other damage. Instead, use just enough water to moisten the cloth and work the cleaner into the floor.
- Let it sit: After applying the cleaner, let it sit on the floor for the recommended amount of time. This will allow the cleaner to penetrate the vinyl and break down dirt and grime.
- Rinse thoroughly: Once the recommended cleaning time has passed, use a clean, damp cloth to rinse the floor thoroughly. Be sure to remove all cleaner residue, as this can leave a residue on the floor that can be difficult to remove later.
- Dry the floor: After rinsing, use a clean towel to blot the floor dry. Avoid using a lot of heat, such as from a hair dryer, as this can cause damage to the vinyl.
By following these steps, you can ensure that your vinyl floor is thoroughly cleaned and looking its best. Remember to always follow the manufacturer’s instructions for the specific cleaner you are using, and to test the cleaner on a small, inconspicuous area of the floor before applying it to the entire surface.
Removing a Vinyl Floor
Before deep cleaning a vinyl floor, it is important to first remove any dirt or debris that may be stuck on the surface. This can be done by sweeping or vacuuming the floor with a brush attachment. If there are any stains or tough spots, a solution of warm water and mild detergent can be used to scrub the area.
If the vinyl floor is very dirty or has not been cleaned in a long time, it may be necessary to remove it and replace it with a new one. This process can be time-consuming and may require the assistance of a professional.
To remove a vinyl floor, the first step is to loosen any tiles that may be stuck to the floor. This can be done by running a utility knife along the edges of the tiles or by using a pry bar to gently pry them up. Once the tiles are loose, they can be lifted and discarded.
Next, the adhesive that holds the tiles in place must be removed. This can be done by scraping it off with a utility knife or by using a heat gun to melt it off. If the adhesive is particularly stubborn, a chemical solvent may be necessary.
Once the adhesive is removed, the floor should be cleaned thoroughly to remove any remaining residue. This can be done by sweeping or vacuuming the floor and then using a solution of warm water and mild detergent to scrub the surface.
Finally, the floor should be inspected for any damage or wear and tear. If necessary, repairs can be made before a new vinyl floor is installed.
FAQs
1. How often should I clean my vinyl floors?
It is recommended to clean your vinyl floors at least once a week to remove dirt and debris that can accumulate over time. This will help to prevent the buildup of grime and stains, which can make the floor appear dull and dirty.
2. What kind of cleaning solution should I use?
When cleaning a really dirty vinyl floor, you may want to use a commercial cleaning solution specifically designed for vinyl flooring. These solutions are usually safe to use on vinyl and will help to remove tough stains and grime. However, be sure to read the label carefully and follow the instructions carefully to avoid damaging the floor.
3. Can I use water to clean my vinyl floors?
Yes, you can use water to clean your vinyl floors. In fact, using plain water is often the best way to clean vinyl floors, as it is gentle on the surface and will not damage the floor. Be sure to use a clean, damp cloth to wipe down the floor, and avoid using too much water, as this can lead to water spots.
4. How do I remove tough stains from my vinyl floors?
To remove tough stains from your vinyl floors, you may need to use a mixture of water and a mild detergent. Apply the mixture to the stain using a soft cloth, and gently scrub the area in a circular motion. You may need to repeat this process several times to fully remove the stain.
5. Can I use bleach on my vinyl floors?
No, you should not use bleach on your vinyl floors, as it can cause damage to the surface of the floor. Instead, try using a commercial cleaning solution specifically designed for vinyl flooring, or use plain water and a mild detergent to clean the floor.
6. How do I dry my vinyl floors after cleaning?
After cleaning your vinyl floors, you should use a clean, dry cloth to wipe down the surface and remove any excess moisture. Avoid using a wet/dry vacuum on the floor, as this can cause water damage to the floor. Instead, use a dry cloth to mop up any excess water.


