A microwave is an essential appliance in every household, providing quick and easy meal solutions. However, it is also a breeding ground for bacteria and germs, which can cause illness if left unchecked. Regular cleaning is crucial to maintaining a healthy kitchen environment. This guide will provide a step-by-step process for disinfecting the inside of your microwave, including tips and tricks to make the process easier and more effective. From removing food residue to using natural cleaning agents, this guide has everything you need to keep your microwave clean and germ-free.
Preparing for Microwave Cleaning
Gathering the Necessary Supplies
When it comes to cleaning the inside of your microwave, there are a few essential supplies that you will need to have on hand. These include:
- Microfiber cloth: A microfiber cloth is a type of cloth that is made from small fibers that are designed to be able to pick up and trap dirt and other debris. This makes it an ideal choice for cleaning the inside of your microwave, as it will be able to effectively remove any stubborn grime or stains that may be present.
- Microwave-safe water: When cleaning the inside of your microwave, it is important to use water that is safe to use in the microwave. This means that you should avoid using hot water, as it can cause the microwave to become damaged. Instead, use cool or lukewarm water, which will be safe to use and will also help to prevent any damage to the microwave.
- Mild dish soap: Dish soap is a useful cleaning agent that can help to break down grease and grime, making it easier to remove. When cleaning the inside of your microwave, you can use a mild dish soap to help loosen and remove any dirt or debris that may be present.
- White vinegar: White vinegar is a natural cleaning agent that can help to remove stubborn grime and stains. It is also effective at removing odors, making it a useful tool for cleaning the inside of your microwave. To use white vinegar to clean your microwave, simply add a few tablespoons to a microwave-safe bowl with water and heat it in the microwave for a few minutes. The steam produced by the hot water will help to loosen and remove any grime or stains.
- Microfiber mop: A microfiber mop is a type of mop that is made from microfiber cloth. It is a useful tool for cleaning the inside of your microwave, as it will be able to effectively remove any dirt or debris that may be present. The microfiber mop can be used wet or dry, making it a versatile cleaning tool.
By gathering these necessary supplies, you will be well-equipped to tackle the task of cleaning the inside of your microwave. With these tools at your disposal, you will be able to effectively remove any dirt or debris that may be present, leaving your microwave looking and smelling fresh and clean.
Unplugging the Microwave and Removing the Turntable
- Safety precautions
- Ensure that you unplug the microwave from the power source before attempting any cleaning or maintenance tasks.
- Do not touch the interior of the microwave while it is still plugged in or switched on, as it can be dangerous.
- Removing the turntable
- The turntable is the circular plate located at the bottom of the microwave oven.
- To remove the turntable, first, locate the turntable motor, which is usually located underneath the turntable.
- Use a screwdriver or a spoon to disconnect the motor from the power source.
- Carefully lift the turntable out of the microwave oven, taking care not to damage the oven’s interior.
- Clean the turntable separately, as it may have food particles or residue stuck to it.
- Once the turntable is clean, place it back into the microwave oven and reconnect the motor.
- Remember to unplug the microwave before reattaching the turntable to ensure safety.
Cleaning the Exterior of the Microwave
Removing Exterior Messes
Cleaning the exterior of your microwave is just as important as cleaning the interior. Here are some steps you can take to remove exterior messes:
- Using a microfiber cloth to wipe down the exterior: The first step in cleaning the exterior of your microwave is to use a microfiber cloth to wipe down the exterior. This will remove any loose debris or dust that may be on the surface. Make sure to use a soft, damp cloth to avoid scratching the surface.
- Removing sticker residue with white vinegar: If you have stickers on the exterior of your microwave that you want to remove, white vinegar can be a helpful solution. Simply apply a small amount of white vinegar to a cloth and wipe down the sticker. Let it sit for a few minutes before wiping it off with a damp cloth. The vinegar should help to dissolve the sticker residue, making it easier to remove.
By following these steps, you can keep the exterior of your microwave clean and free from messes.
Cleaning the Control Panel
Cleaning the control panel is an essential part of maintaining the appearance and functionality of your microwave. Here are some steps you can follow to clean the control panel:
- Removing grime and stains: The first step in cleaning the control panel is to remove any grime and stains that have accumulated over time. To do this, you can use a microfiber cloth and mild dish soap. Gently wipe the cloth over the control panel, focusing on any areas with visible stains.
- Using a cotton swab dipped in white vinegar: For stubborn stains or grime, you can use a cotton swab dipped in white vinegar. Gently insert the cotton swab into the crevices of the control panel and let it sit for a few minutes before wiping it away with a clean microfiber cloth.
- Drying the control panel: After cleaning the control panel, it’s essential to dry it thoroughly to prevent any water spots from forming. You can use a clean microfiber cloth to gently pat down the control panel and remove any excess moisture.
By following these steps, you can ensure that your microwave’s control panel is clean and functional for years to come.
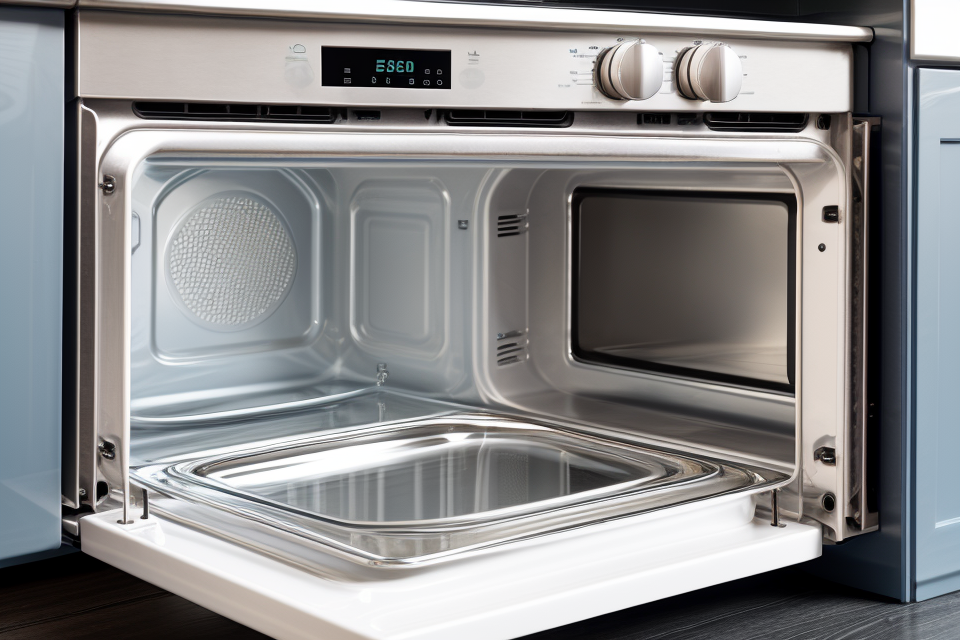
Cleaning the Inside of the Microwave
Removing Food Residue
Heating a Bowl of Microwave-Safe Water with a Few Drops of Mild Dish Soap
To start, it is important to first ensure that the microwave is completely clean and free of any food residue. One effective method for removing food residue is to heat a bowl of microwave-safe water with a few drops of mild dish soap. The heat from the microwave will cause the steam to rise and loosen any stubborn food particles, while the dish soap will help to break down the grease and grime.
Letting it Sit for a Few Minutes
Once the bowl of water has been heated, it should be allowed to sit in the microwave for a few minutes. This will give the steam enough time to penetrate the walls and surfaces of the microwave, loosening any food particles that may have accumulated. It is recommended to let it sit for at least 5-10 minutes to allow the steam to work its magic.
Wiping Down the Interior with a Microfiber Cloth
After the water has sat in the microwave for a few minutes, it can be safely removed by wiping down the interior with a microfiber cloth. The microfiber cloth is a great choice because it is soft and gentle on the surfaces of the microwave, yet strong enough to pick up even the toughest grime and stains. The cloth should be wrung out in warm water before use, and then used to wipe down all surfaces of the microwave, paying extra attention to any areas with particularly stubborn food residue.
Cleaning the Fan Filter
The fan filter is a crucial component of your microwave that requires regular cleaning to ensure its proper functioning. It is located behind the grille at the top of the microwave, and its main function is to filter air that enters the microwave cavity. The fan filter is responsible for preventing the entry of foreign objects such as crumbs, liquids, and other debris into the microwave. Over time, the filter becomes dirty and clogged, which can affect the performance of the microwave.
To clean the fan filter, you will need a microfiber cloth. The microfiber cloth is a soft, non-abrasive cloth that is designed to remove dirt and dust from delicate surfaces without causing any damage. To clean the fan filter, follow these steps:
- Unplug the microwave: Before cleaning the fan filter, make sure to unplug the microwave from the power source to avoid any electrical shocks.
- Remove the grille: To access the fan filter, you need to remove the grille at the top of the microwave. To do this, use a screwdriver to remove the screws holding the grille in place.
- Pull out the fan filter: Once you have removed the screws, carefully pull out the grille to access the fan filter.
- Use a microfiber cloth to clean the filter: Use a microfiber cloth to gently clean the fan filter. Avoid using harsh chemicals or abrasive cleaners as they can damage the filter.
- Allow the filter to dry: Allow the fan filter to dry completely before putting the grille back in place and plugging in the microwave.
It is important to note that while cleaning the fan filter, you should leave it in place. This is because the fan filter is an essential component of the microwave that helps to regulate the airflow and prevent the entry of foreign objects into the microwave cavity. Removing the filter may result in damage to the microwave or reduce its performance.
By following these steps, you can keep your microwave’s fan filter clean and ensure that it continues to function properly.
Cleaning the Grease Filter
- Pulling out the grease filter
The first step in cleaning the grease filter is to pull it out of the microwave. This can typically be done by pulling on the handle or using a flathead screwdriver to loosen it. - Scrubbing it with a microfiber cloth and mild dish soap
Once the grease filter is removed, use a microfiber cloth and mild dish soap to scrub away any built-up grease and grime. This can be done by gently scrubbing the filter with the cloth, using the dish soap as a lubricant to help loosen tough grime. - Rinse with microwave-safe water
After scrubbing the grease filter, rinse it thoroughly with water that is safe to use in a microwave. This will help remove any remaining soap residue and leave the filter clean and ready to be reinstalled in the microwave.
It’s important to note that when cleaning the grease filter, avoid using harsh chemicals or abrasive cleaners as these can damage the filter and reduce its effectiveness in capturing grease and other debris. Additionally, make sure to allow the filter to dry completely before reinstalling it in the microwave to prevent any moisture from building up and causing damage.
Cleaning the Interior Walls
Removing Food Residue with a Microfiber Cloth and Mild Dish Soap
- Gently wipe down the interior walls of the microwave with a damp microfiber cloth and mild dish soap.
- Be sure to focus on any areas with visible food residue, as this is where bacteria can grow and cause unpleasant odors.
- Use a clean, damp cloth to wipe down the walls of the microwave until they are free of residue and shiny.
Scrubbing Tough Stains with a Mixture of White Vinegar and Water
- For tough stains or residue that cannot be removed with a microfiber cloth and dish soap, mix equal parts white vinegar and water in a spray bottle.
- Spray the mixture onto the affected area and let it sit for several minutes before scrubbing with a non-abrasive sponge or cloth.
- Rinse the area thoroughly with water and dry it with a clean towel.
By following these steps, you can ensure that your microwave’s interior walls are clean and free of bacteria, leaving you with a cleaner and more hygienic appliance.
Restoring the Microwave to its Original Condition
Drying the Microwave
Drying the microwave is an essential step in the cleaning process, as it helps to prevent the growth of bacteria and ensures that the appliance is free from moisture. Here are some tips on how to dry the microwave effectively:
- Using a microfiber mop to soak up excess moisture: After cleaning the microwave with warm water and detergent, use a microfiber mop to soak up any excess moisture. This will help to prevent water spots and ensure that the microwave dries evenly.
- Letting the microwave air dry completely: Once you have removed any excess moisture with a microfiber mop, it’s important to let the microwave air dry completely. Open the door and let the microwave sit in a well-ventilated area for several hours or overnight. If you’re in a hurry, you can use a clean towel to pat the interior dry, but be sure to avoid rubbing or using any abrasive materials that could scratch the surface.
It’s important to note that using a microwave drying method is a safer alternative to using a heat source to dry the microwave. This is because microwaves are designed to be used with moisture, and applying heat to the interior of the microwave could cause damage to the finish or create hot spots that could pose a fire hazard. By allowing the microwave to air dry naturally, you can ensure that it is clean and safe to use.
Putting the Turntable Back in Place
- Wiping down the turntable with a microfiber cloth
Before placing the turntable back in the microwave, it is important to wipe it down with a microfiber cloth. This will remove any remaining dirt or debris that may have accumulated during the cleaning process. It is important to use a microfiber cloth as opposed to a regular cloth as it is less likely to leave lint or other debris behind.
- Placing it back in the microwave
Once the turntable has been thoroughly cleaned and dried, it can be placed back in the microwave. It is important to ensure that it is properly aligned with the microwave’s guides and that the wheels are free to rotate. If the turntable does not rotate properly, it may need to be adjusted or replaced.
Restoring the Microwave to Its Original Position
Plugging the microwave back in
After completing the cleaning process, the first step in restoring the microwave to its original position is to plug it back in. Make sure to check that the cord is securely plugged into the wall outlet and that the outlet is working properly. If you notice any frayed wires or damaged components, it’s best to consult a professional for repairs.
Turning it on to test the fan and heating elements
Once the microwave is plugged in, the next step is to turn it on and test the fan and heating elements. Press the “cook” or “bake” button, and if the microwave doesn’t turn on, there may be a problem with the power supply or control board. If the microwave does turn on, but the fan or heating elements aren’t working, there may be a problem with the motor or other mechanical components.
If you notice any issues with the fan or heating elements, it’s best to consult a professional for repairs. Additionally, make sure to unplug the microwave before attempting any repairs to ensure your safety.
Enjoying a Clean Microwave
- Enjoying the results of your cleaning efforts
- The satisfaction of a clean and functional microwave
- Appreciating the improvement in the microwave’s performance
- Maintaining a clean microwave for optimal performance and longevity
- Regular cleaning to prevent the buildup of grime and residue
- Preventing damage to the microwave’s interior
- Extending the lifespan of the microwave
By following the steps outlined in this guide, you can enjoy a clean and functional microwave that performs optimally. The satisfaction of a clean and well-maintained microwave cannot be overstated. You will appreciate the improvement in the microwave’s performance, as it will heat food more evenly and efficiently. Regular cleaning is essential to prevent the buildup of grime and residue, which can damage the microwave’s interior and reduce its lifespan. By following the guide’s recommendations, you can keep your microwave in top condition and extend its lifespan.
FAQs
1. What is the best way to clean the inside of a microwave?
The best way to clean the inside of a microwave is to use a mixture of water and vinegar. Mix equal parts of water and vinegar in a microwave-safe bowl, and heat it in the microwave for 5-10 minutes or until the solution is steaming hot. Then, carefully remove the turntable and any other removable parts, and wipe down the interior of the microwave with a sponge or cloth.
2. Can I use any cleaning products to clean my microwave?
It is best to avoid using harsh chemicals or abrasive cleaners to clean your microwave, as they can damage the surfaces and leave residue behind. Stick to gentle cleaning solutions like water and vinegar, or mild dish soap and water.
3. How often should I clean my microwave?
It is recommended to clean your microwave at least once a month, or more frequently if you use it regularly. This will help prevent the buildup of food and bacteria, and keep your microwave smelling fresh and clean.
4. Can I use a microwave cleaner or pods to clean my microwave?
Yes, you can use microwave cleaners or pods to clean your microwave. These products are designed specifically for cleaning microwaves and can be easily used by placing them in the microwave and heating them for a few minutes. However, it is important to follow the instructions carefully and avoid using too much of the product, as it can damage the surfaces of your microwave.
5. Is it safe to clean my microwave with water and vinegar?
Yes, it is safe to clean your microwave with water and vinegar. The vinegar is an effective natural cleaner that can break down grease and grime, while the water helps to dilute and rinse away the cleaner. However, it is important to avoid using too much vinegar, as it can damage the surfaces of your microwave.
6. How do I remove stubborn stains or odors from my microwave?
To remove stubborn stains or odors from your microwave, you can try using a mixture of baking soda and water. Mix equal parts of baking soda and water to form a paste, and apply it to the stain or odor using a sponge or cloth. Let it sit for 30 minutes, then scrub it away with a sponge or cloth. You can also try using a microwave cleaner or pod, following the instructions carefully.


